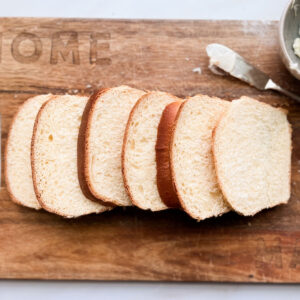
Super Soft White Sandwich Bread
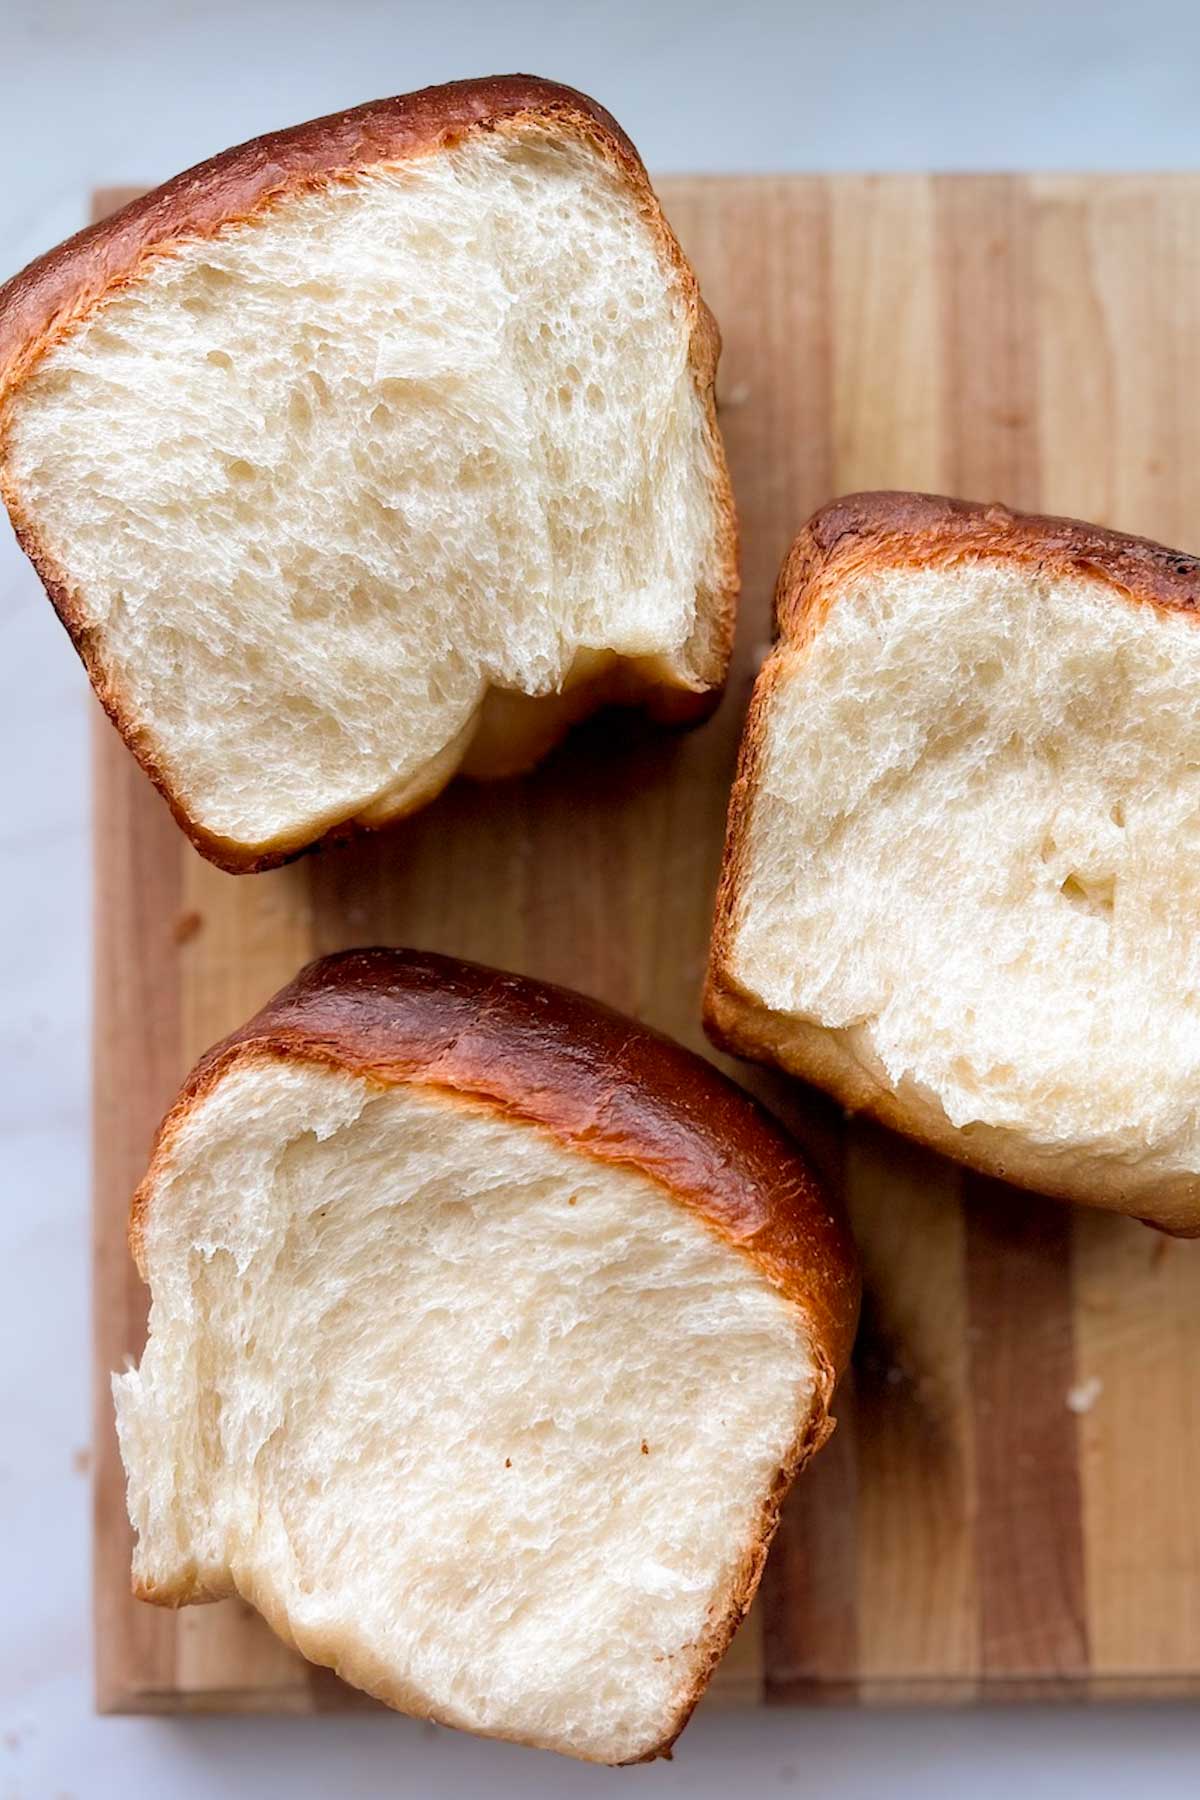
This super soft white sandwich bread is the perfect everyday loaf, but is anything but ordinary. It makes delicious sandwiches and toast! Using the Tangzhong method, this bread bakes up extra soft, and stays fresh for up to one week! Whether you’re a beginner bread maker, or more experienced, you’ll love this easy bread recipe!

(This post contains affiliate links. Read our disclosure policy)

A 5-star recipe! One reader says:
“I tried this recipe today, I actually made this into buns.
I am just amazed with the results. It’s really too good.
So soft fluffy and tasted so well.
Thank you for sharing!”
Table of contents
Why you’ll love this Super Soft White Sandwich Bread
This is that one really good bread recipe you’ll keep going back to. It’s the perfect everyday bread that makes everything extra yummy. You’ll love it too:
- Yummy! It’s the perfect homemade bread for school lunches, sandwiches, and toast with jam.
- Quick and easy – I love simple and easy yeast bread recipes like this one! Just like my Easy French Bread Loaf, it’s one of those simple recipes that turns out great every time.
- Longer shelf life – The Tangzhong method makes this THE best sandwich bread! It adds extra moisture and keeps it fresher longer! Once you try it, you’ll be hooked.
- Versatile! Use this dough to make homemade bread or fluffy dinner rolls.
- Freezes well! Just like my Beginner Sourdough, you can also slice it first, then freeze it in a ziplock freezer bag. Pull out as many slices as you need at a time. The bread can go directly from the freezer to the toaster!
- Sourdough option. If you’re a fan of easy sourdough recipes, you can use your ripe sourdough starter to make this bread too! Check the recipe notes for my suggestions.
Bread Baking
I like to set aside a “bake day” once every couple weeks. I’ll get lots of breads, muffins, Sourdough English Muffins, and other goods made. Then I freeze the extras. Just like when I make my Honey Whole Wheat Bread or my Sourdough Blueberry Muffins, I like to double this white bread recipe and freeze the extras for later. It’s so nice to be able to pull a loaf out of the freezer when we need it.
Important Ingredients
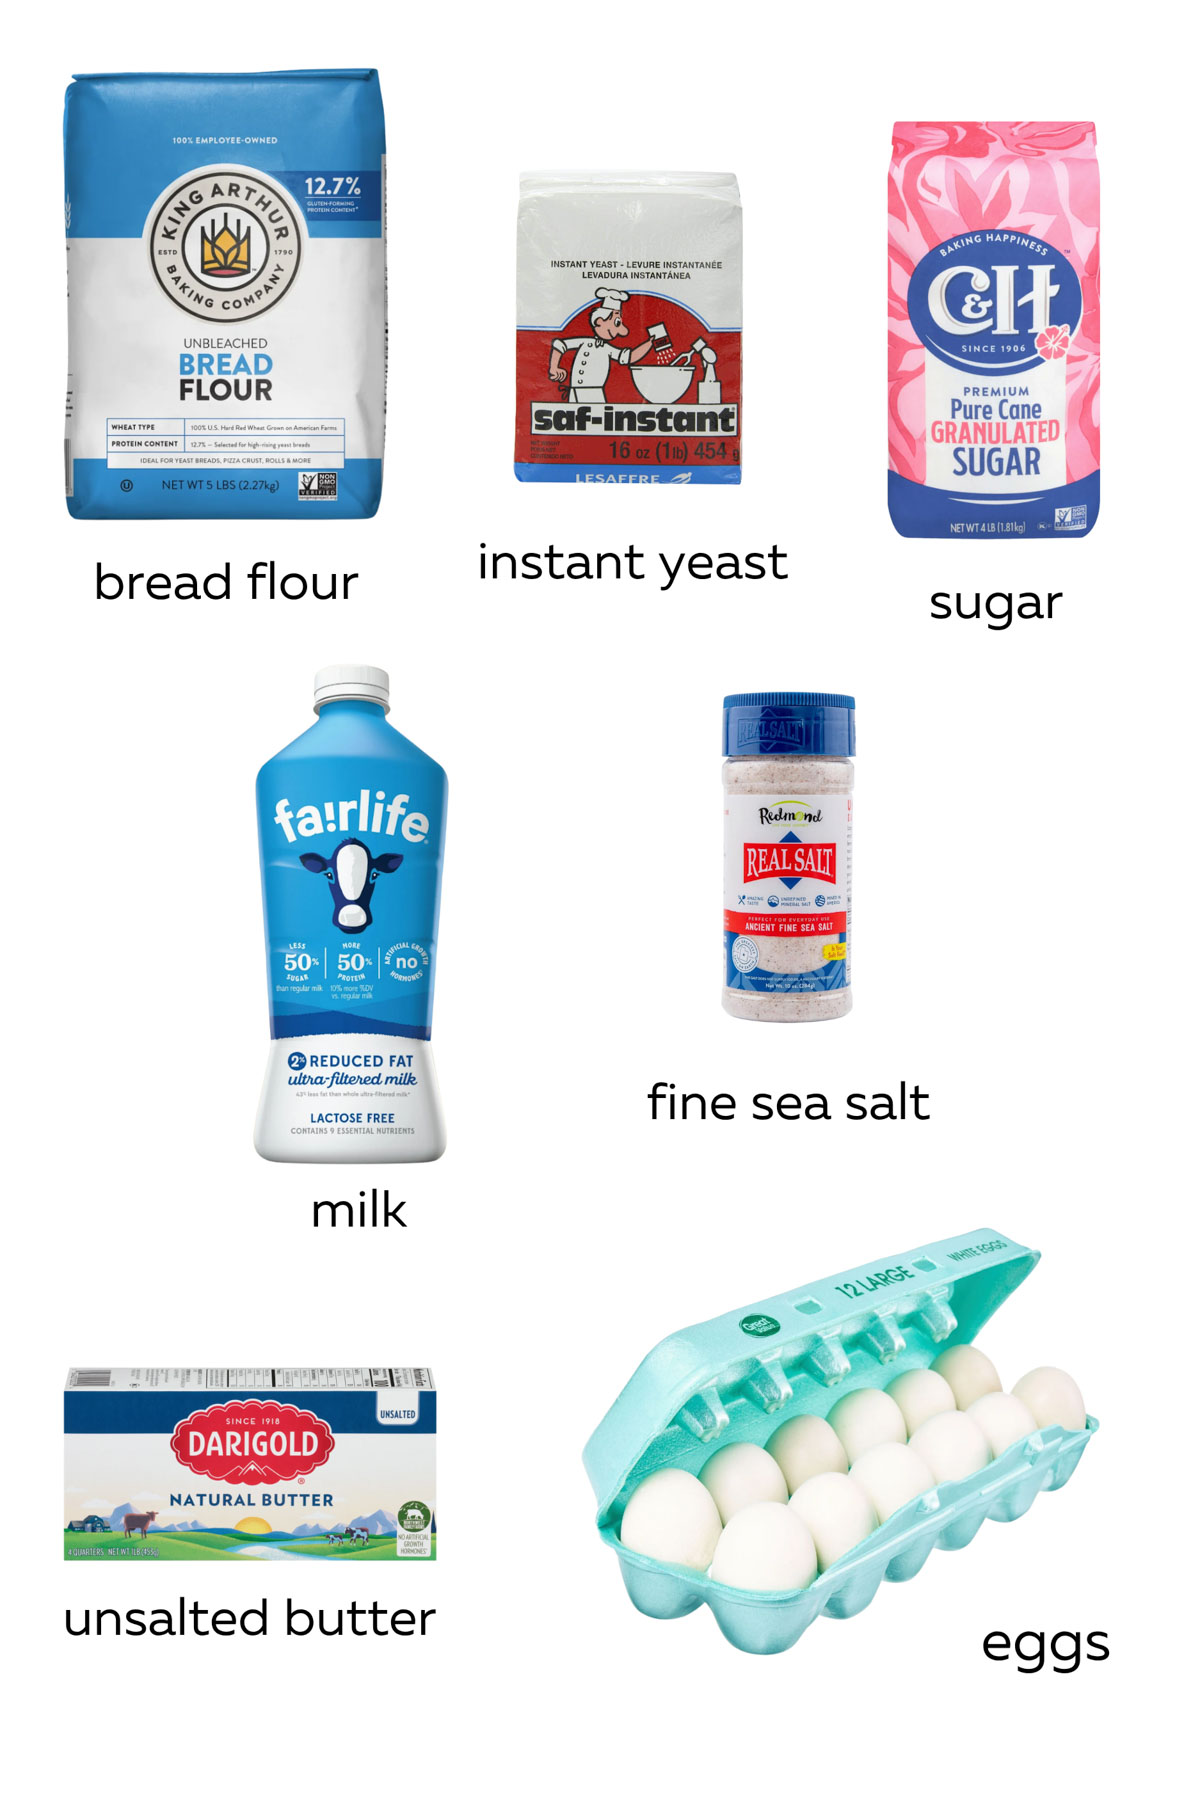
- Bread flour – A higher protein flour, like bread flour, is higher in gluten. This means it is great for breads where you need the dough to hold its shape as it rises and bakes. Bread flours typically have 11-13% protein content.
- Instant Yeast – I suggest using instant yeast, to skip the step of blooming your yeast. It is excellent for rising this homemade bread.
- Milk – It does many things for homemade bread, but mostly, milk is great for creating a softer crumb, a rich flavor, and a golden crust.
Substitutions
Flour – While bread flour is best for this recipe, you could use all-purpose flour if that’s all you have. Keep in mind, the dough will be a bit stickier, and you may need to add more flour to get it to a tacky dough. Try other recipes with bread flour like my Raspberry Brioche Rolls.
Yeast- You can use Active Dry Yeast instead of Instant Yeast. You will need to bloom it first – sprinkle it over the warm milk and let it sit for 15 minutes. If it bubbles and foams, the yeast is ready to use for your recipe. If it never foams, you need to replace the yeast with a new packet. Read my article about Active Dry Yeast vs. Instant Yeast for more about when to use which one.
How to make bread with tangzhong
Make the Tangzhong

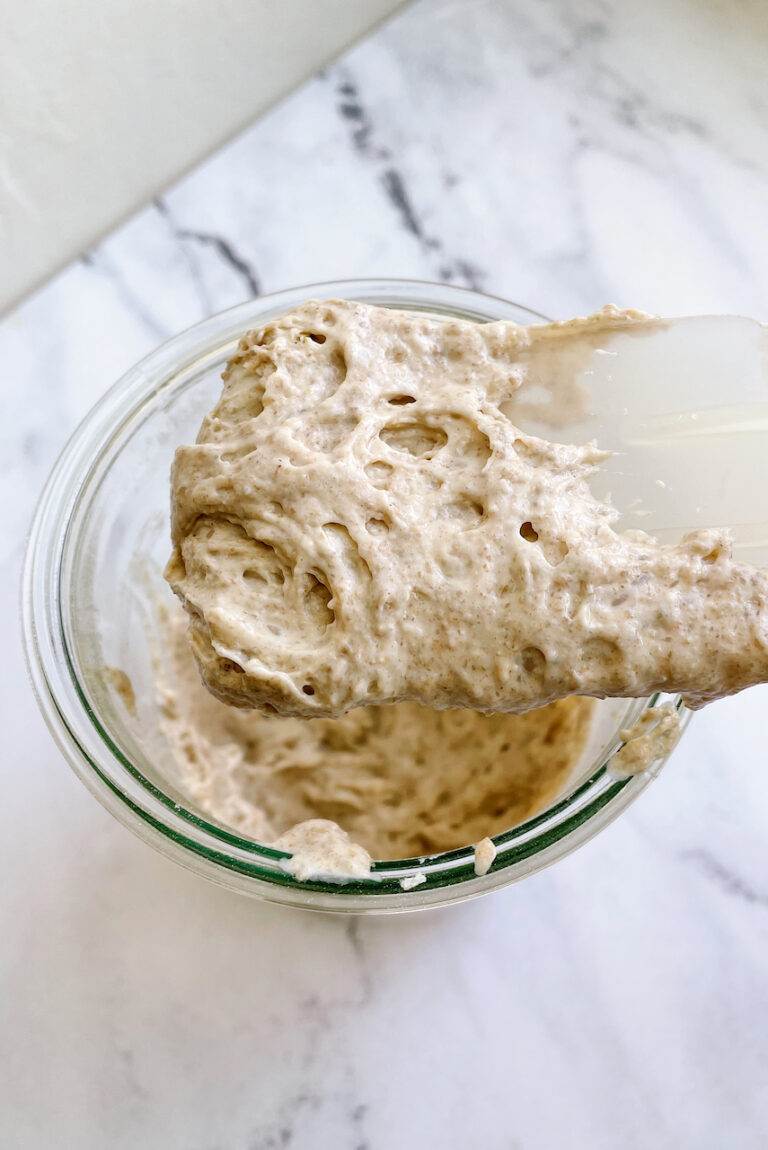
Step 1: Combine the milk, water, and flour in a saucepan. Stir until it thickens to a slurry-like texture. Remove from heat.
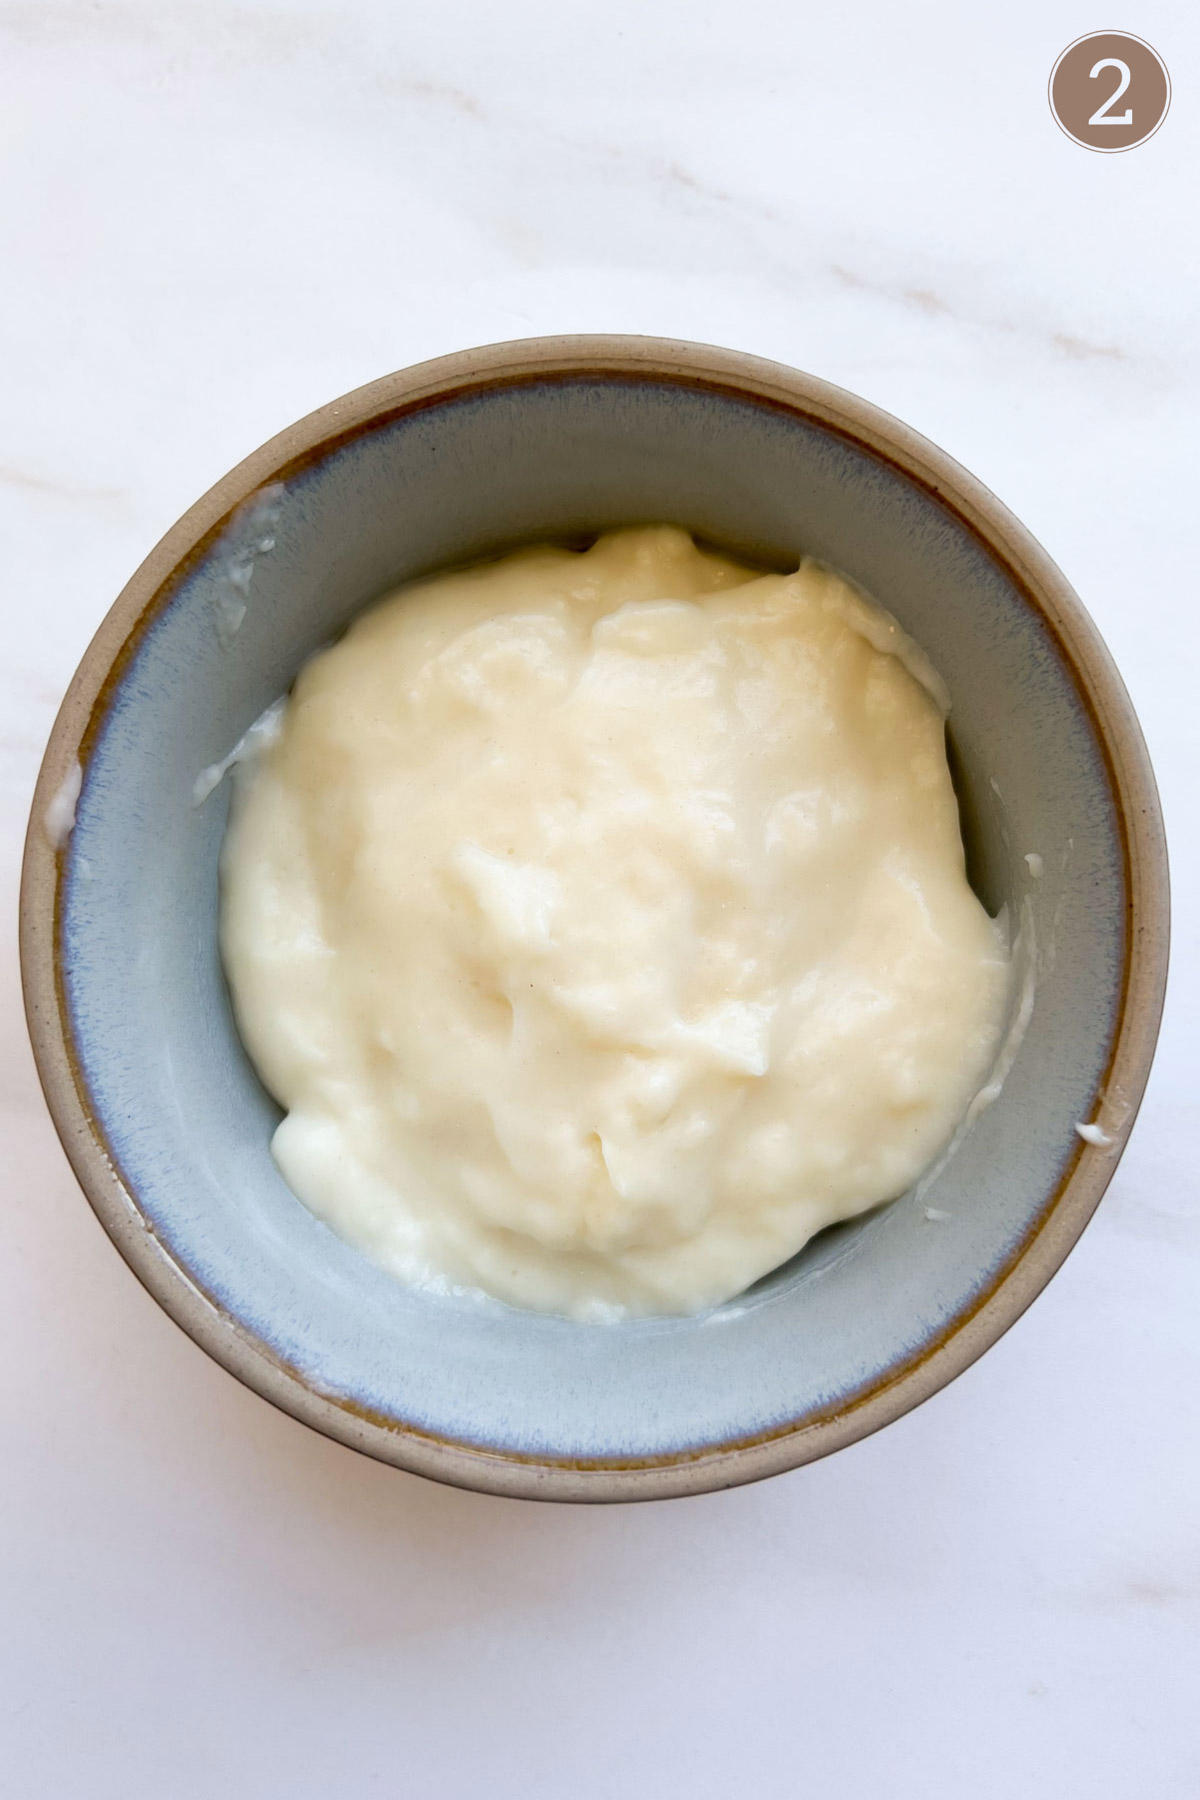
Step 2: Transfer the tangzhong mixture into another bowl to cool. It will set even further, similar to a jelly-like consistency.
A note about Tangzhong: I love this method and use it in a few recipes like my pull apart Garlic Knots. This method pre-gelatinizes the starches in the flour, meaning it can absorb more water. In fact, flour will absorb twice as much hot water or milk as it does the cool/lukewarm water or milk you’d usually use in yeast dough. Most often, it’s used in a recipe for Japanese Milk Bread, which is very similar to this fluffy bread recipe. The results:
- Dough is less sticky and easier to work with.
- Bread will rise higher – more retained water creates more steam when baking. Which, in turn, yields a loaf that will rise more when baked.
- Stays fresher longer!
Mixing the dough
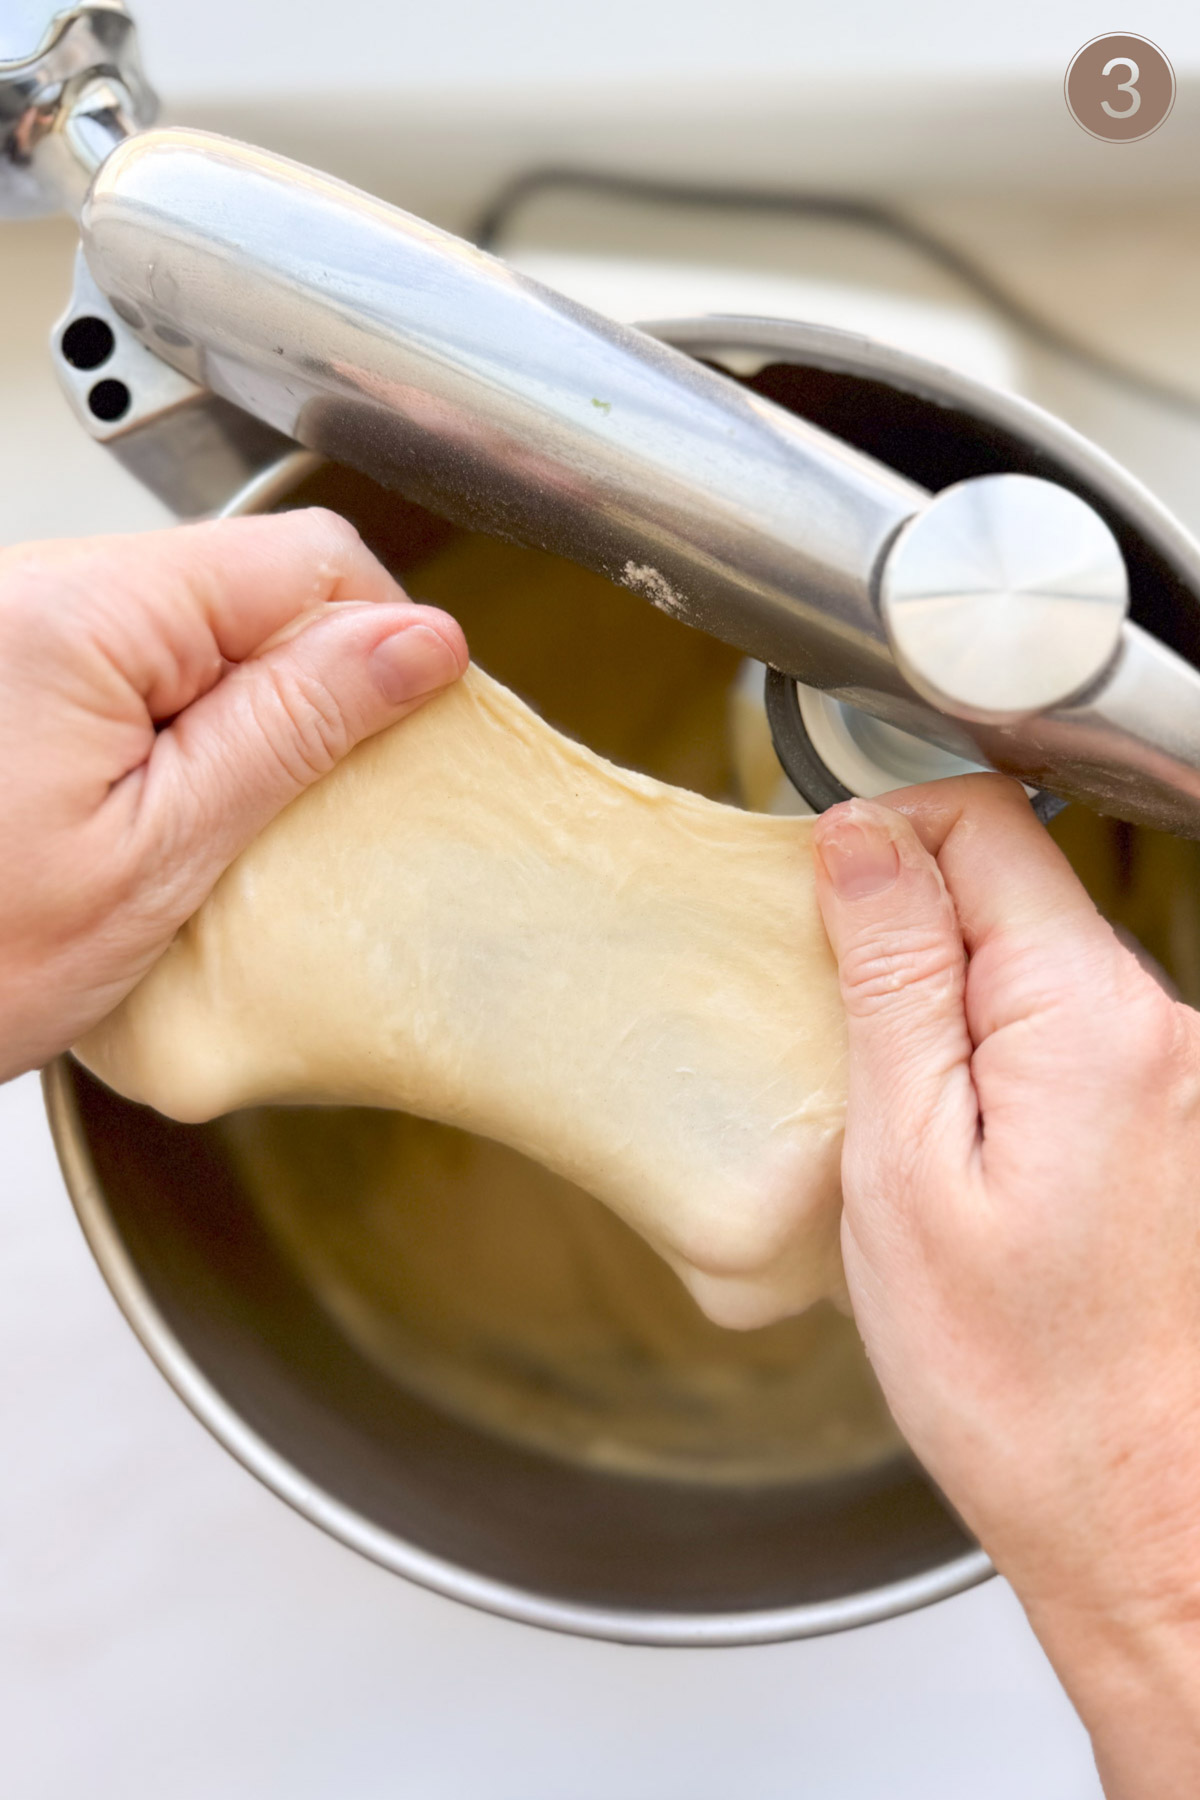
Step 3: Mix the ingredients for the dough, including the Tangzhong mixture. Knead the dough until it reaches windowpane. This means you can stretch the dough a few inches apart without it tearing.
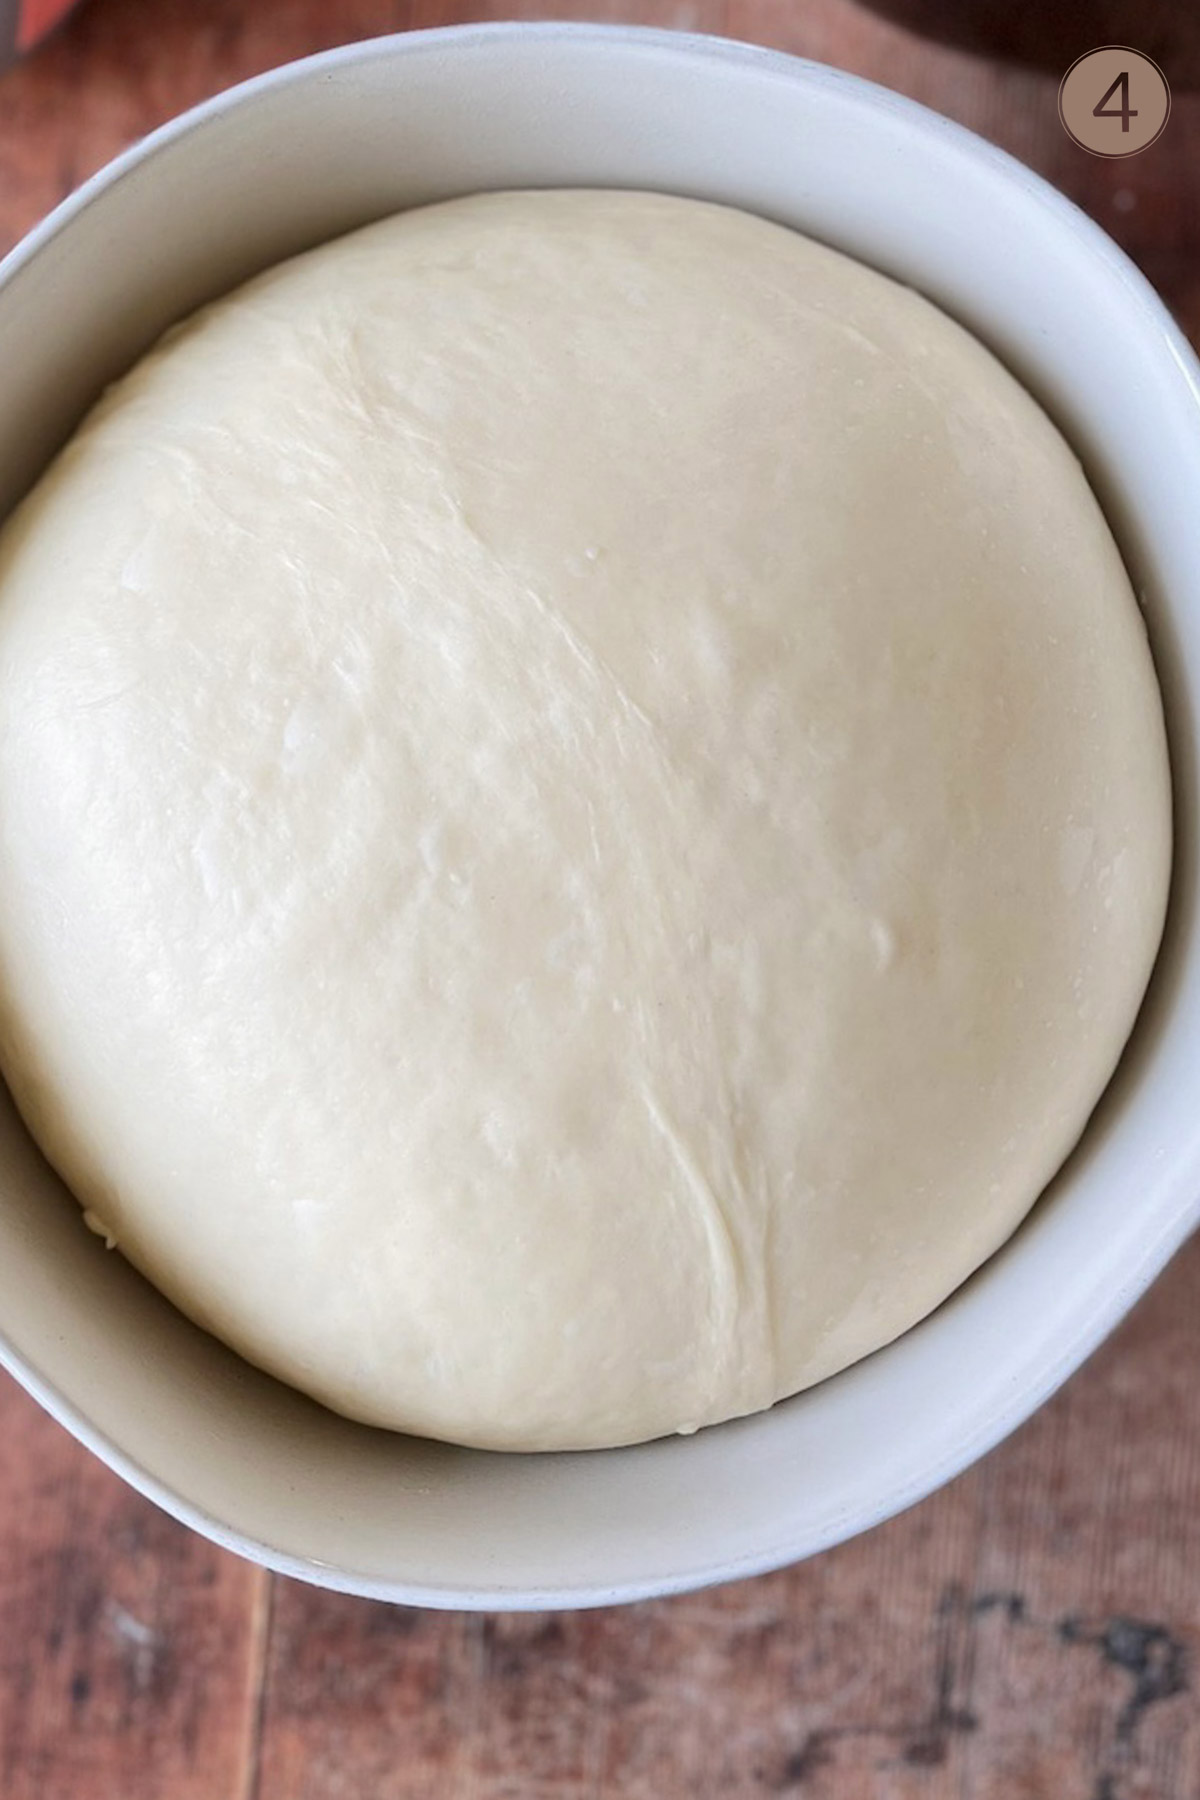
Step 4: Place the dough in a bowl and cover it. Let it rise in a warm place in your kitchen until it doubles in size. This step is often referred to as Bulk Ferment.
Heather’s mixing tip:
You may not need all the flour, or you might need a bit more. It can vary slightly depending on: the flour type and brand you’re using, the humidity of your kitchen, and many other factors. This dough is softer, like my Parker House Dinner Rolls. If you’ve added all the flour and are unsure if you should add more, let the dough rest for 10 minutes. This will give it a chance to hydrate. Then tap on the dough with your fingertip. It should feel tacky but not wet.
Shaping the Loaves
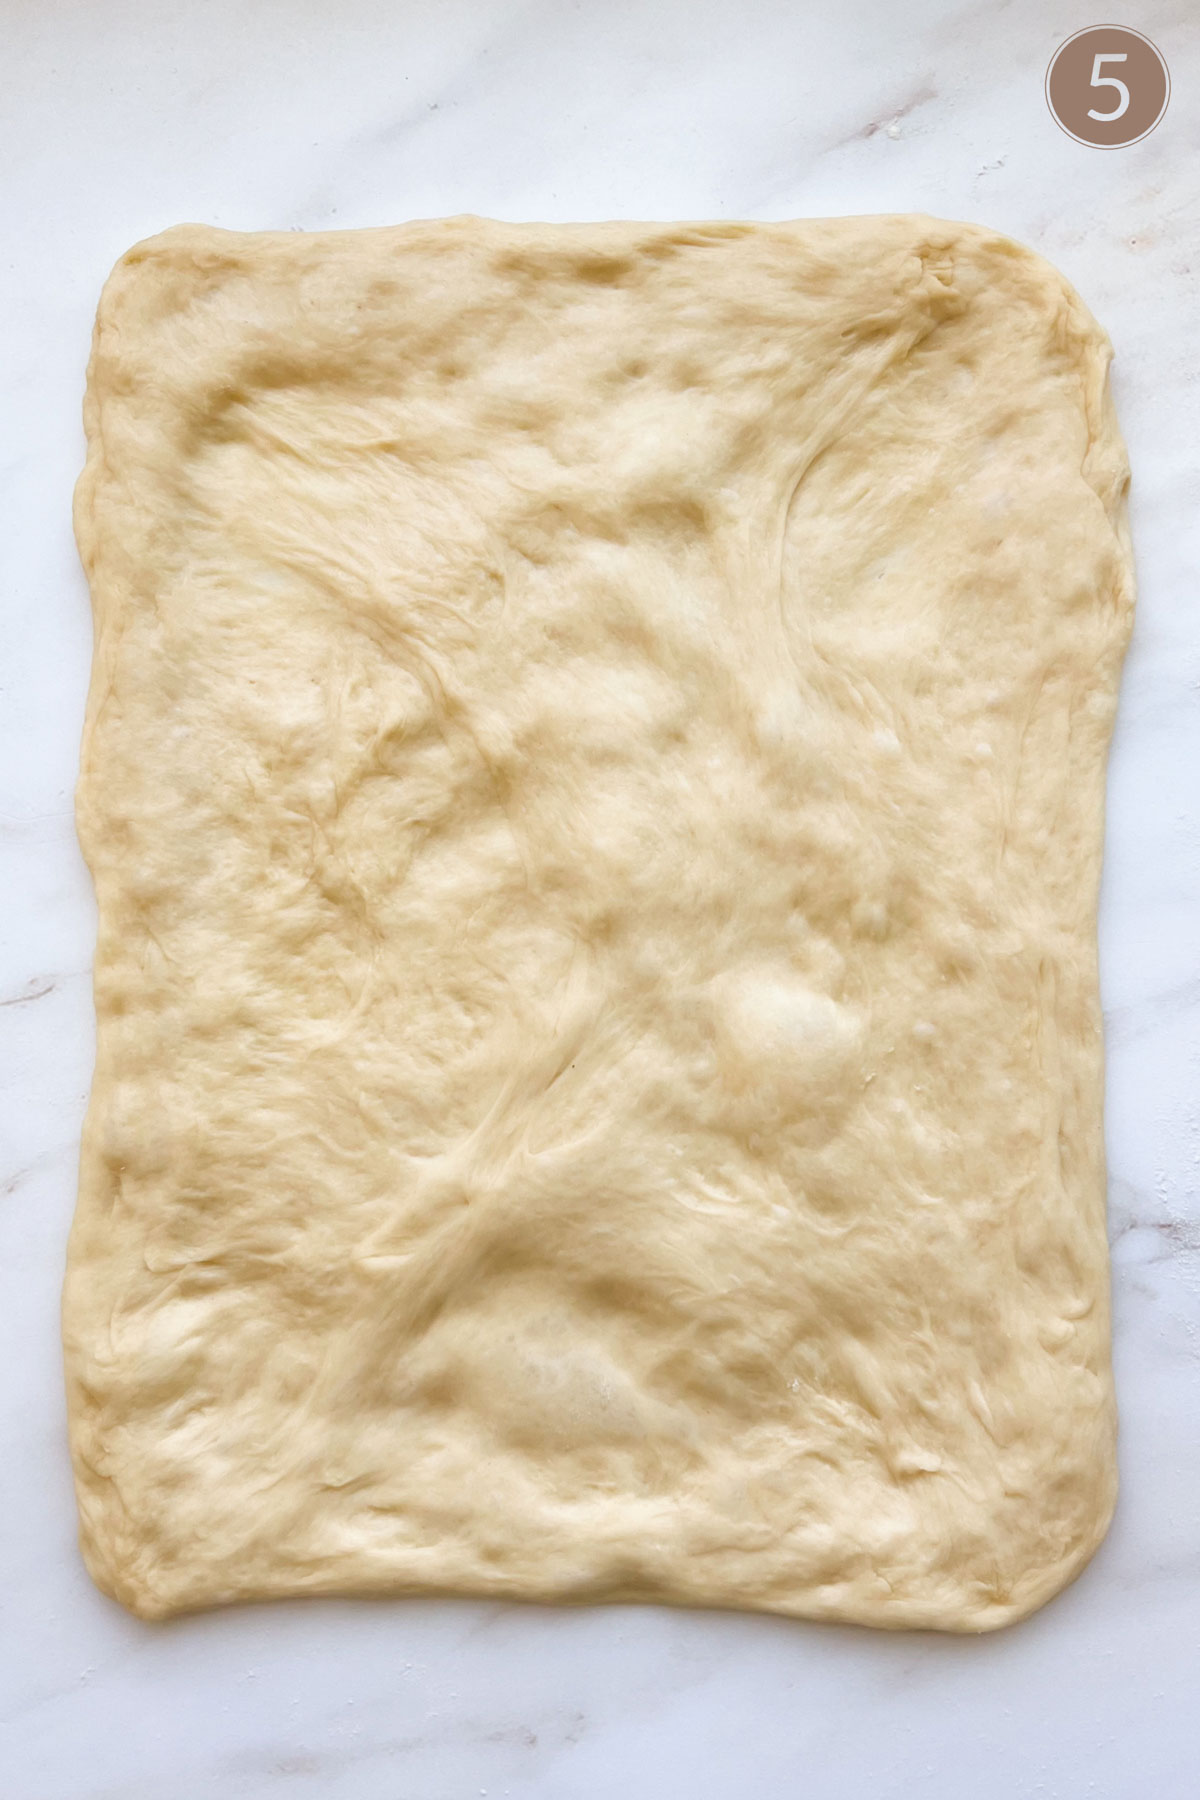
Step 5: Divide the dough into two equal pieces. Flatten the dough to a rectangle, about 10 inches wide and 12 inches long.
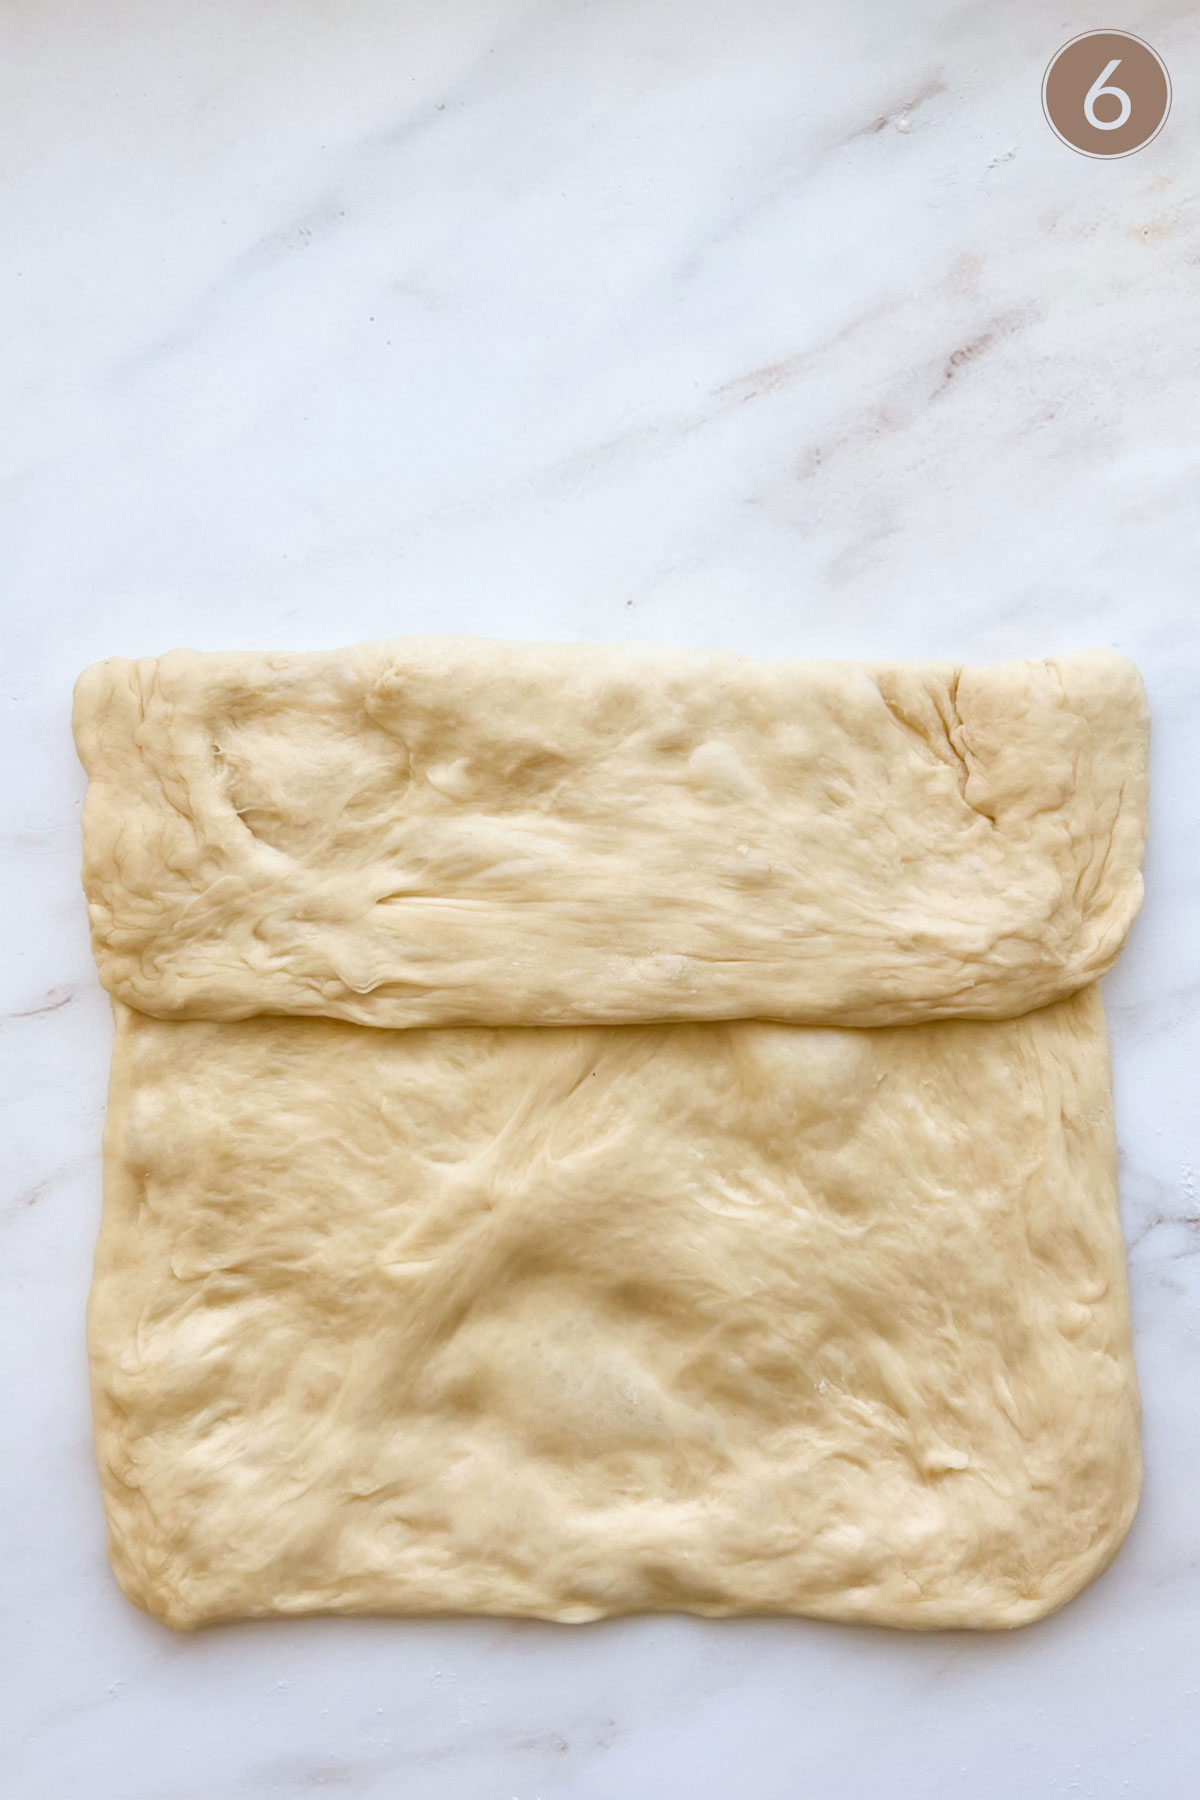
Step 6: Fold the top third of the dough down, towards the center.
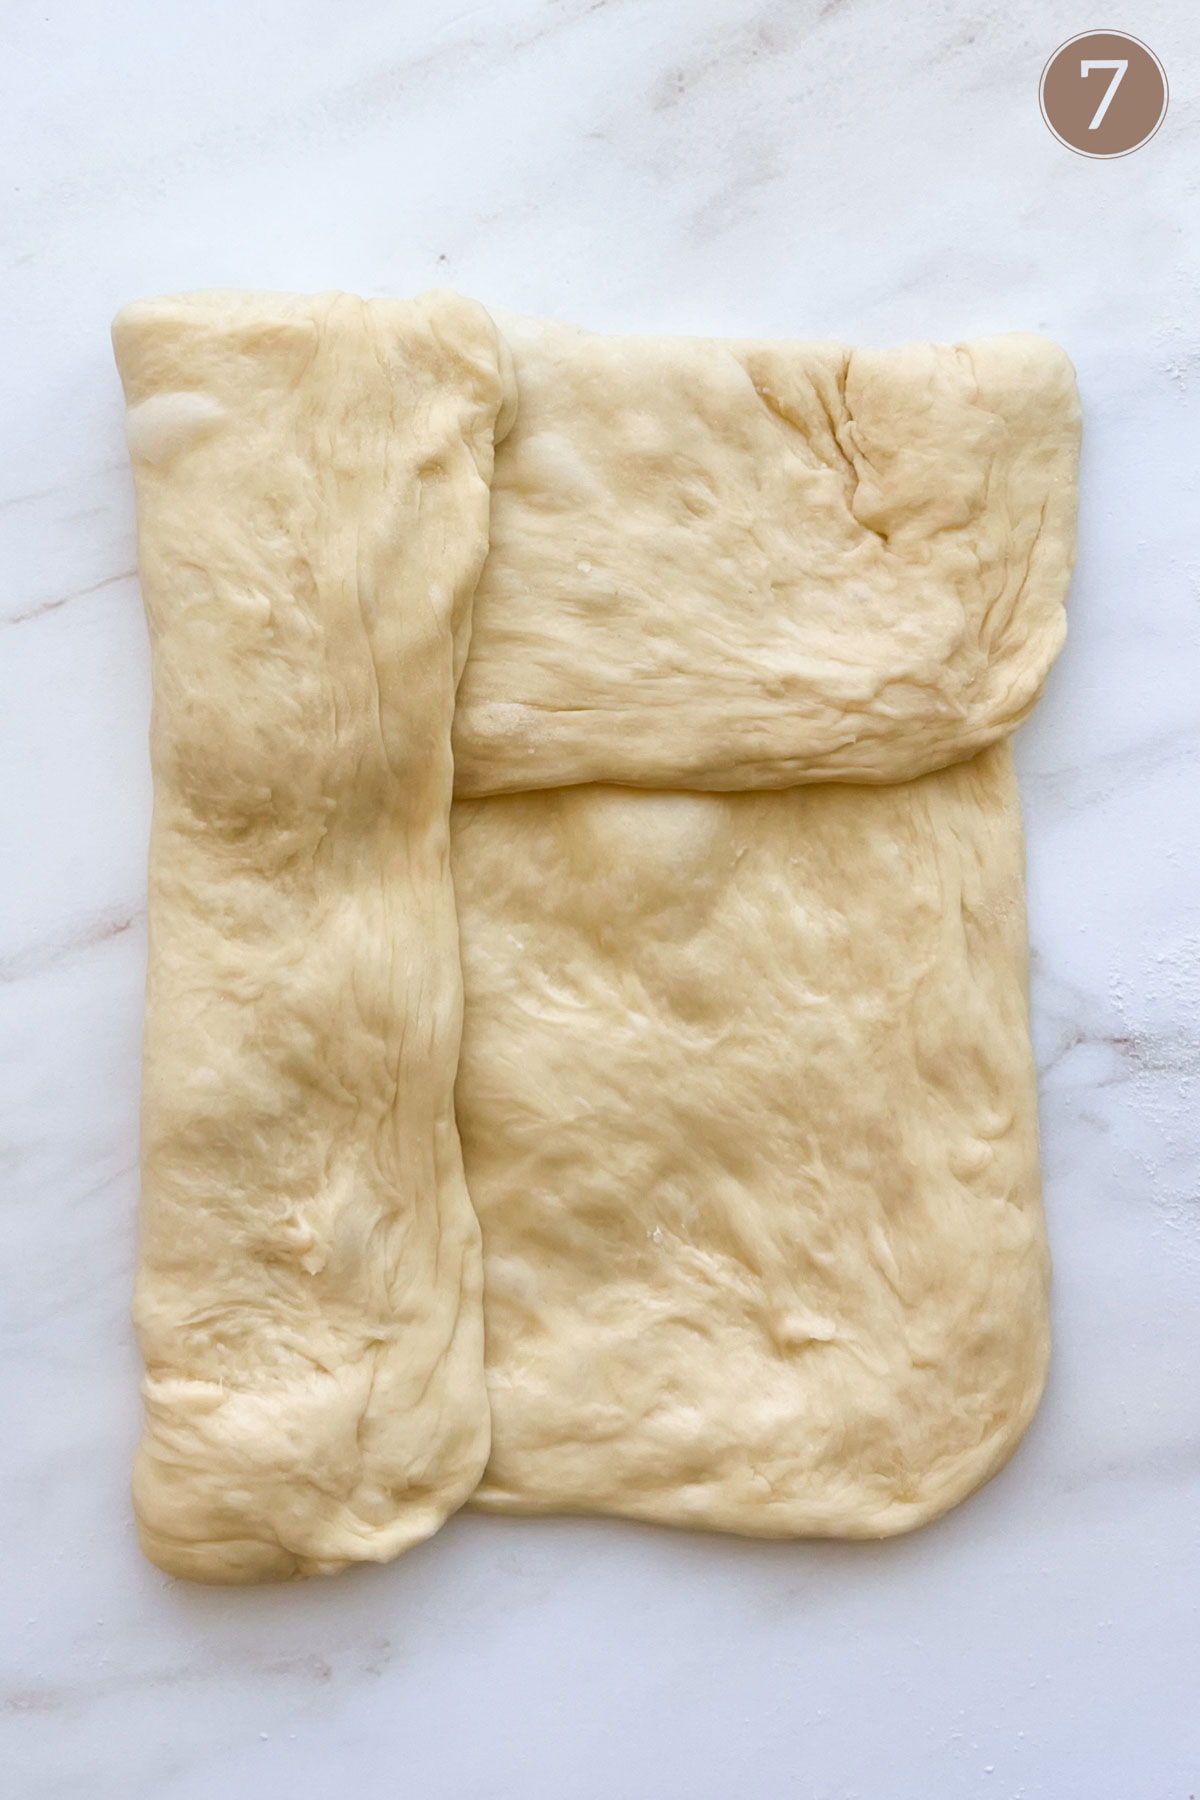
Step 7: Fold the left half of the dough over, towards the center.
Step 8: Fold the right half of the dough over, towards the center. The two edges should meet together.
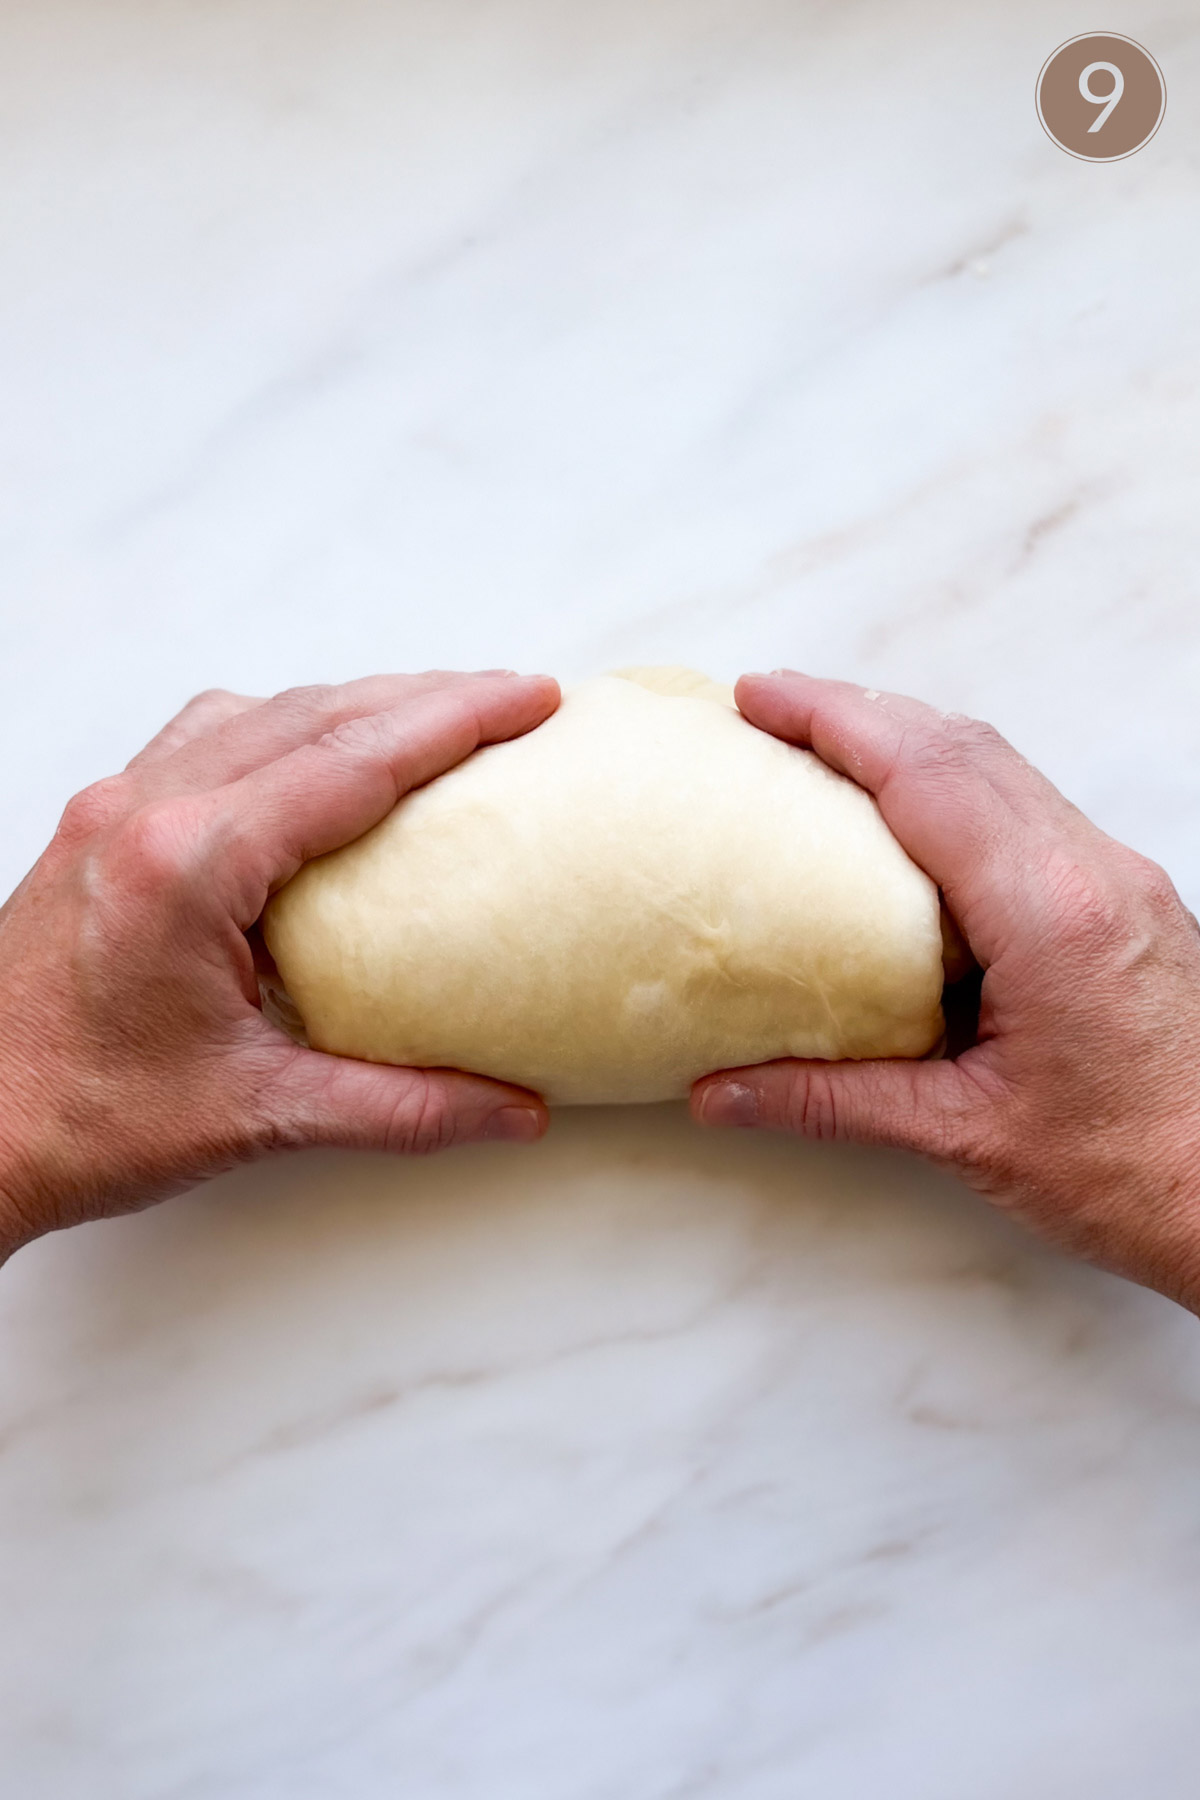
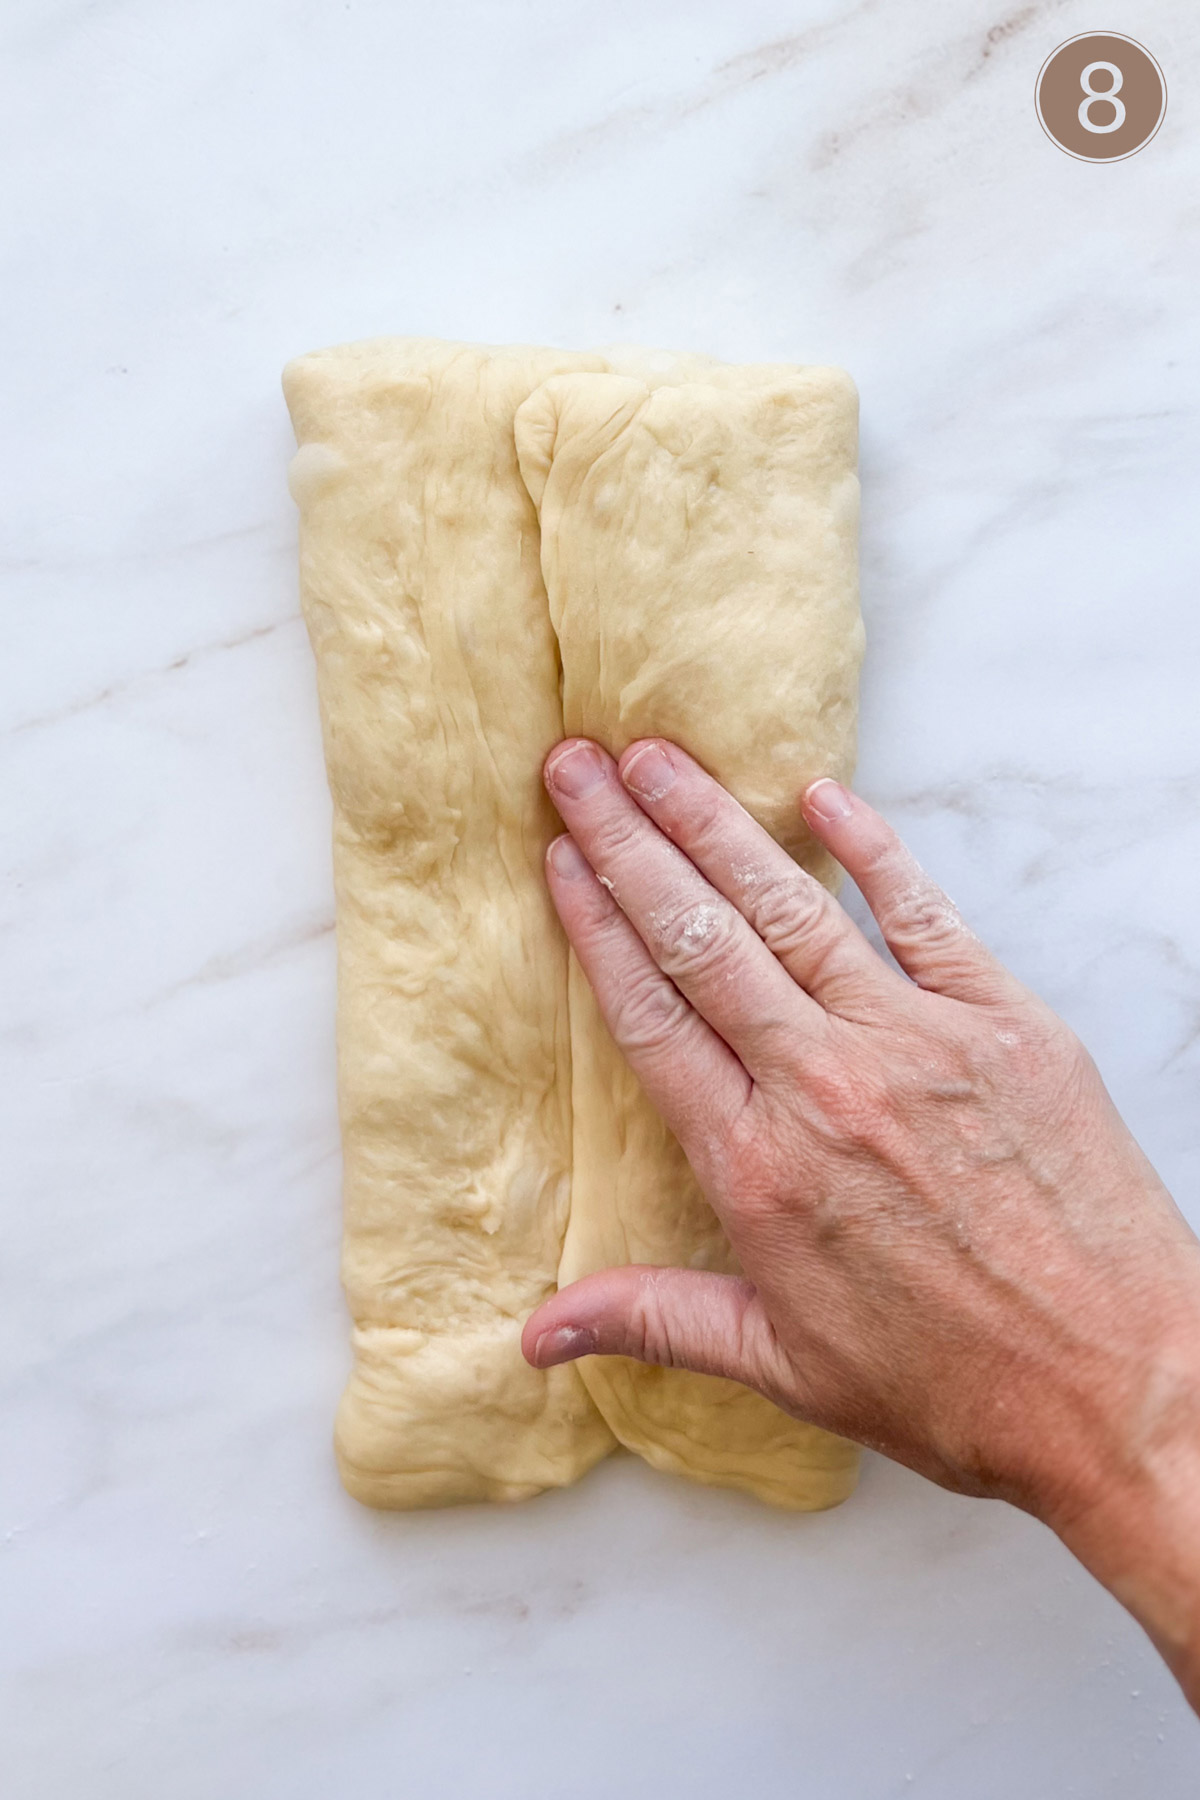
Step 9: Roll the dough upwards, forming a loaf. Drag the loaf back towards you a few times to tighten up the surface of the dough.
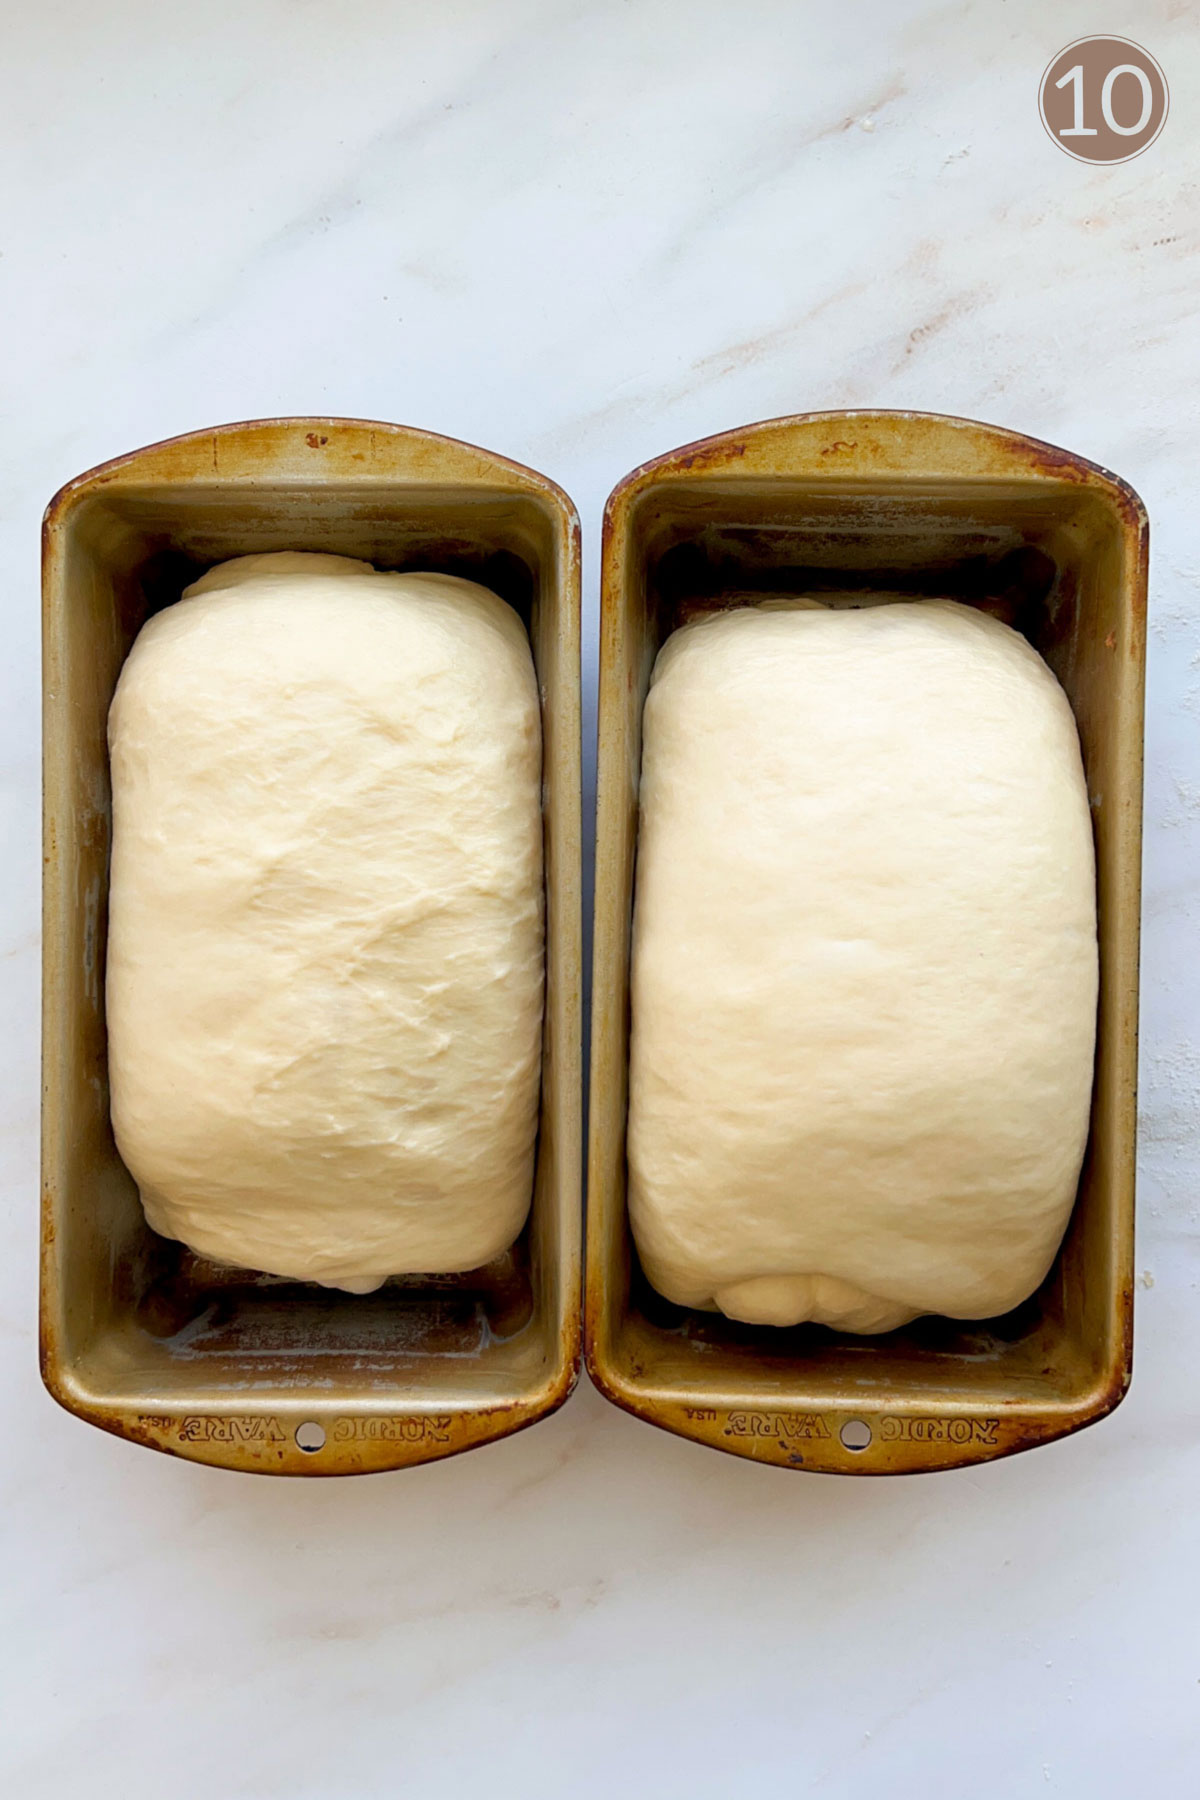
Step 10: Place the loaves into an oiled bread pan. Cover lightly with plastic wrap to keep them from drying out. Rise in a warm place in your kitchen.
Proofing the loaves: I like to use something called the “poke test” to see if my loaves have risen enough.
- Gently press into the side of the dough with your fingertip. It should leave an indent that slowly springs back.
- If it does not leave an indent, it needs more time to rise.
- If it leaves an indent that doesn’t spring back, the bread is over proofed and you should bake immediately.
Baking the loaves
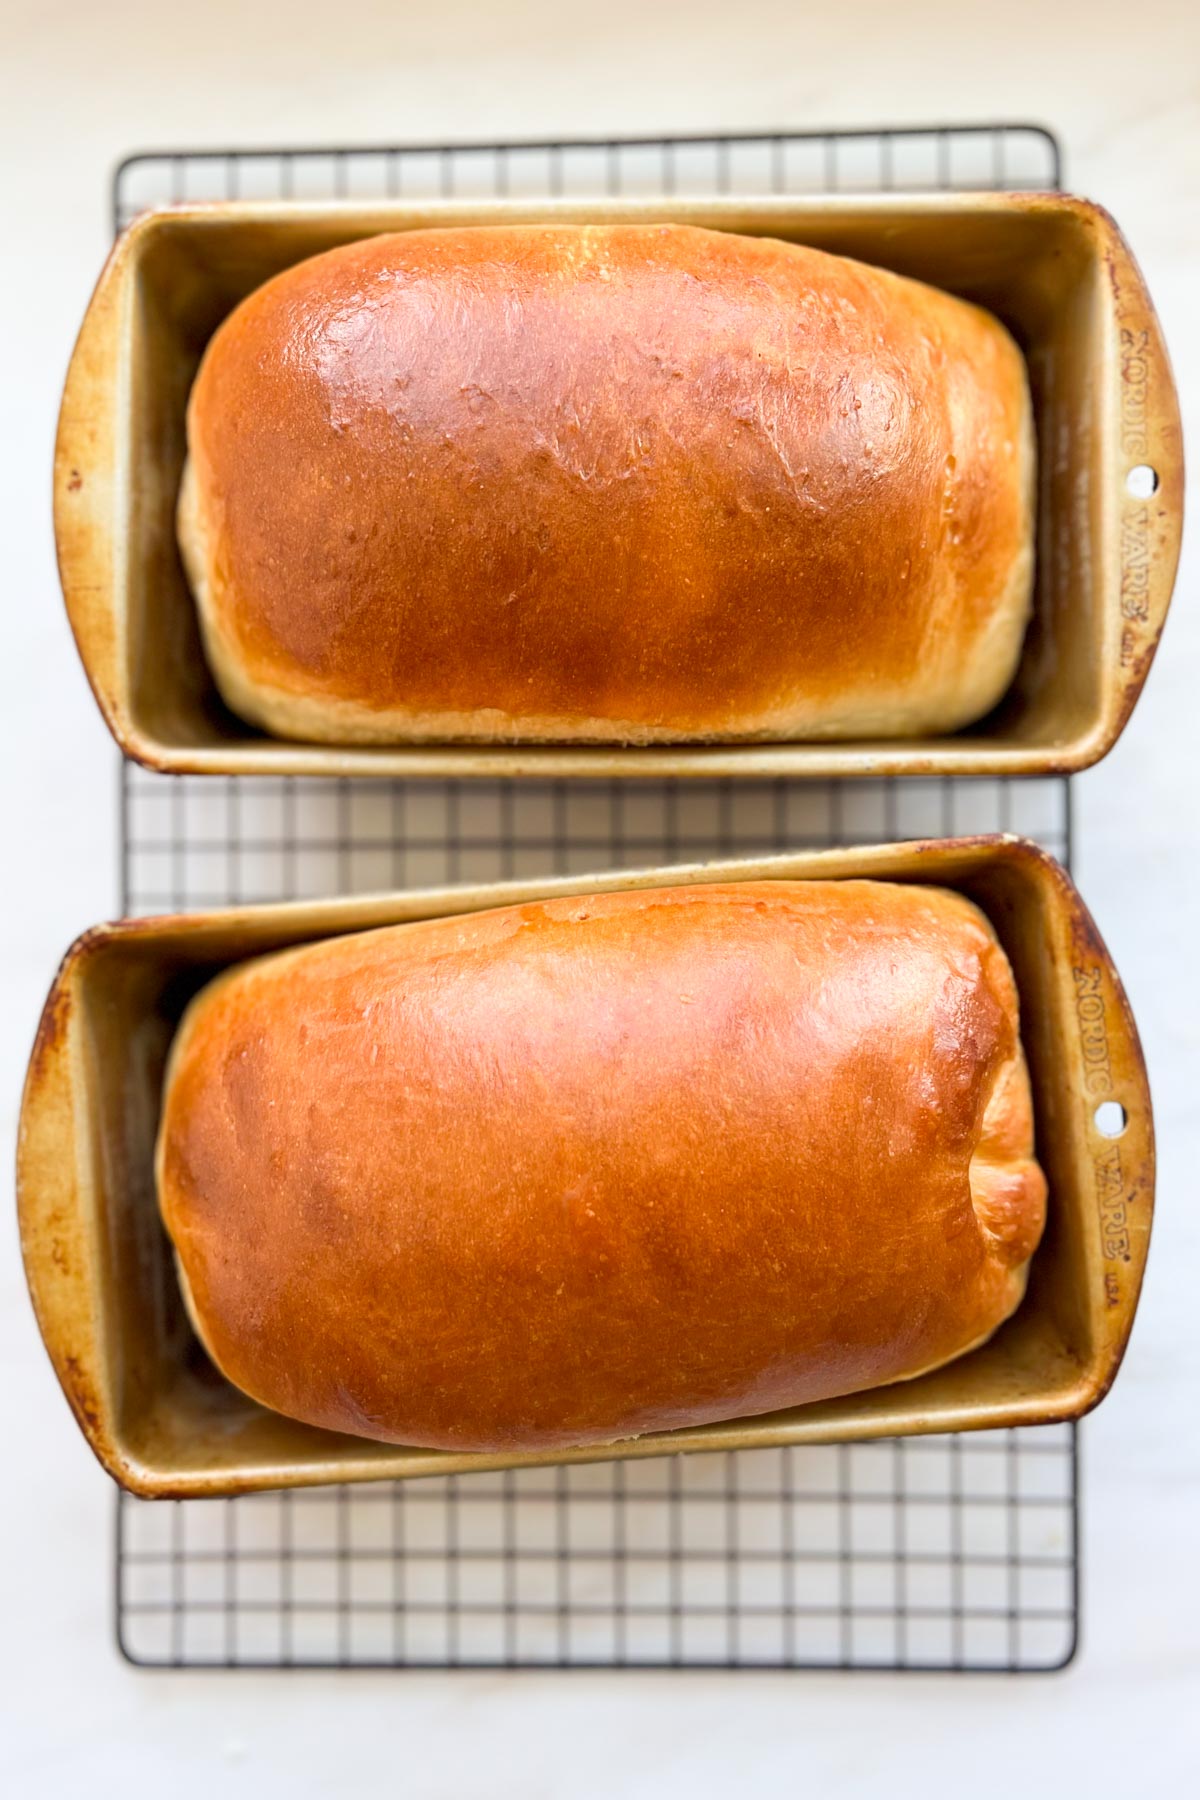
- Brush the tops of the loaves with egg wash before baking. This gives it a shiny, golden crust.
- Bake until golden brown and the internal temperature reaches 200°F, about 30 minutes.
- Cool in the pan for 20 minutes before transferring to a wire cooling rack.
How to store homemade bread
Allow the loaves to cool completely before placing in a bread bag or ziplock bag. Keep it airtight to keep the bread from drying out. I’ve had this tangzhong bread stay fresh for up to one week! You can also freeze the entire loaf, or slice it first and then freeze it.
Frequently Asked Questions
This recipe makes 2, 8-inch loaves. Use a 4×8-inch loaf pan for best results. I’ve also had good results using a small Pullman loaf pan, which is 9x4x4-inches.
This is typically caused by either poor shaping or over proofing. This can also happen if you’re using a loaf pan that’s too large for the amount of dough.
Homemade bread can get dry if there’s too much flour added to the dough. Also, it can end up dry and crumbly if you over proof the loaf.
Tangzhong is an Asian baking technique . It’s the simple method of cooking a portion of the flour and liquid from the recipe to create a thick mixture or slurry. After cooled, it is added to the recipe.
This method pre-gelatinizes the starches in the flour, meaning it can absorb more water. In fact, flour will absorb twice as much hot water or milk as it does the cool/lukewarm water or milk you’d usually use in yeast dough. Most often, it’s used in a recipe for Japanese Milk Bread, which is very similar to this fluffy bread recipe.
Other bread recipes you will love
Super Soft White Sandwich Bread Recipe
Super Soft White Sandwich Bread
Equipment
Ingredients
Tangzhong
- ⅓ cup water
- ⅓ cup milk whole or 2%
- 3 Tablespoons bread flour
Dough
- The tangzhong mixture cooled to lukewarm temperature ~85°F/30°C
- ¾ cup milk whole or 2%, lukewarm ~85°F/30°C
- ⅓ cup granulated sugar
- 2 teaspoons fine sea salt
- 2 Tablespoons instant yeast
- 2 large eggs room temperature
- 4 ¼ cups bread flour ~13%protein
- 6 Tablespoons unsalted butter softened
Instructions
Make the Tangzhong
- Add all the ingredients for the tangzhong to a small saucepan. Before turning on the heat, whisk the ingredients together, smoothing out any lumps of flour. Once combined, place the saucepan on medium low heat, stirring constantly until it thickens to a paste-like mixture (like making a rue), about 5 minutes.
- Remove from the heat and transfer the tangzhong into a heat-safe bowl. Set aside to cool to a lukewarm temperature, about 85°F/30°C. Pro tip: Spread the hot tangzhong on the bottom of your mixer bowl – it will cool down faster.
Mix the dough:
- To the bowl of a stand mixer, combine the tangzhong mixture, milk, sugar, salt, instant yeast, 2 eggs and about half of the flour. On low speed, mix with the dough hook attachment until combined and smooth. Gradually add the remaining half of the flour. Continue to mix until fully combined. The dough will be thick and slightly dense.
- While on low speed, add the softened butter, one tablespoon at a time. Allow butter to fully incorporate between additions. This could take up to 5 minutes. While adding the butter, the dough will begin to smooth out and become softer.
- Knead dough for 10-15 minutes on low speed, until it forms a cohesive, smooth ball of dough. It should come to window pane (check blog post for tips on the windowpane test). At this point, the dough should feel very soft and elastic. It will become easier to handle after it rises during bulk fermentation.
Bulk Fermentation:
- Place the dough into a larger, greased bowl. Cover with a plastic bowl cover or clean kitchen towel. Let rise until doubled in size, about 60-90 minutes.
Shaping:
- Grease loaf pans with nonstick spray and set aside.
- Turn dough onto a lightly floured work surface and deflate. Divide dough into 2 equal pieces, each weighing about 525g.
- Working with one piece of dough at a time, gently stretch the dough, with your hands, to a rectangle about 10-inches by 12 inches. Be careful as to not tear the dough. Fold the top third over towards the center. Fold the left and right sides in towards the center, meeting in the middle. Gently press the vertical seam together. Roll the dough up, starting at the end closest to you. With the seam side down, drag the loaf towards you, tightening the outer layer of the bread and sealing the bottom seam shut. (see blog post for shaping pictures)
- Place each loaf in the loaf pan with the seam side down. Cover with a clean kitchen towel.
Final Proof:
- Let the bread rise in a warm area of your kitchen, around 40-60 minutes until risen about 50% in size.
- During the rise time, begin preheating oven to 350°F. Place the oven rack just below the center position.
Baking:
- Before baking, use the poke test to make sure the dough has risen enough – Gently poke the side of the dough with your finger. If it leaves an indentation, it is time to bake. (see blog post for more about the poke test)
- Brush egg wash on top of the loaves and bake for 30-35 minutes. It should be golden brown and the internal temperature should be at least 195°F.
- Place the loaves on a wire rack, leaving them in the pans for 20 minutes before removing. Allow to cool completely on the wire rack before slicing.
- Store leftover bread in a bread bag for up to one week. Or store in the freezer for up to 3 months.
Notes
- Sourdough option: If replacing yeast with 100% hydration sourdough starter, use 1/2 cup (120g) ripe starter. Ripe starter is active and bubbly and just about ready to be fed. Be sure to reduce the bread flour and milk in the dough recipe to compensate for the amount you are adding with the starter. If using a 100% hydration starter, reduce the flour by 60g and the milk by 60ml. Rise times will be longer, depending on the activity of your starter and the climate in your kitchen.
- Make ahead option: When placing dough in container for Bulk Fermentation, you can refrigerate it for up to 24 hours before shaping. Placing in the refrigerator will slow down the fermentation (rise). The dough will continue to rise in the refrigerator, but at a slower rate. When ready to bake, remove dough from refrigerator and let rest in the container, at room temperature, for 30 minutes. Divide dough, shape and place in bread pans to rise. Depending on how warm your kitchen is, chilled dough may take up to an extra hour to rise before baking.
Nutrition


Hi
I tried this recipe today,I actually made this in to buns.
I am just amazed with the results.its really too good.
So soft fluffy and tasted so well.
Thank you for sharing
So glad you liked it!!
I don’t have bread flour, can I use all purpose?
Yes you can use all-purpose, but it will be more sticky and difficult to work with. You may need to add a bit more flour to make it more manageable.
I made this recipe today and oddly, the loaves are kind of sunk in on the sides. Everything else seems fine. I’m a seasoned baker and have made tons of sandwich bread. I used instant yeast. I’m not entirely sure what causes this. I am also in AZ so the only thing I can think of is perhaps overproofed due to a warm kitchen, but it didn’t appear that way before baking. Got plenty of oven spring. Oh well, I think it’s going to taste amazing!
Hi Megan,
It’s hard to say what might be the problem without seeing your loaves, but my initial question is…what size pans did you use? In the post, I suggest a standard size loaf pan which is 8-1/2×4-1/2×2-1/2 inches. If your pan is bigger than that, you most likely will not have as fluffy as a loaf as it will bake outwards instead of upwards. The only other thing I can think of is overproofing, which can cause the loaf to collapse or sag after coming out of the oven.
Have you ever made this with the Food nanny commute flour? It seems to be better for my family that has issues with gluten. Do you have any suggestions what I could do if using that flour instead?
I have not made this with Kamut flour, but you could definitely give it a try. You may notice that you don’t need as much flour in the final mixing. Let me know how you like it!
Hi,
I am just now making this recipe, and it seems like the metric measurements are not correct on some of the ingredients, when compared to the US measurements?
example: I measured out 1 Tbls of instant yeast, and it weighed 9 grams, which is the weight you have listed for the 2 Tbls of yeast?
These other ingredients are off too, just not as much as the yeast.
Butter, salt, bread flour
The sugar and the milk seem to be fine.
I am going to use the US measurements, as hopefully, this is what the others used that made this and were happy with the outcome.
Please advise as to which is correct.
Thanks!
Hi Jeanette,
When measuring by volume (US measurements), results can very, from baker to baker. This is why I also include metric measurements too. Weighing your ingredients will insure that you are replicating the recipe exactly how it was written. I always encourage bakers to weigh ingredients for the best possible results.
Correction on my previous comment . . .
The butter weight is correct.
I only have active dry yeast. Can I use that instead of instant yeast? If so, how do I use it? Do I do anything different? The is my first attempt at bread & I’ve never used either product.
Oh yay! I’m so excited for you! Yes you can use active dry yeast! With instant yeast, you can just add it straight to the recipe. But with active dry yeast, you need to activate it first before adding to the recipe. You can sprinkle it into the milk and let it sit for about 10 minutes to make sure it bubbles up. Wait as long as 15 minutes – if nothing happens, it’s probably yeast that needs to get replaced. If it does bubble up, go ahead and add that mixture to the recipe and continue to mix as directed. Let me know how it goes! You can read more about yeast in this article: https://thatbreadlady.com/active-dry-yeast-vs-instant-yeast/
Is it possible to bake these loaves in disposable aluminum pans? If so, would there be any changes to the baking?
You definitely can. Just make sure they’re the right size. They might bake faster on the bottoms since the foil is thinner. I’d try baking one loaf first to test it out before committing your entire batch to it. Maybe place the foil pans on top of a baking sheet to keep the bottoms from getting too brown. Check the loaves 5 minutes earlier to see how they’re doing. Let me know how it turns out.
Thanks! I ended up just buying actual loaf pans 🙂 It turned out amazing! Reminded me of a brioche loaf. Is there a big difference between this and brioche?
Oh great! Yes, brioche is more egg and butter enriched. See my Brioche recipe here.
This bread baked up so soft and fluffy.my new favorite bread recipe!
Our family loves this bread! Thank you Heather!
Thank you for trying it out! So glad you’re loving it!
So yummy my family loves this recipe! I was wondering when doubling the recipe, how long should it be kneading for? I have a Bosch mixer. I tried doubling the recipe and kneading took over an hour to achieve the window pane test. Trying to double so that I freeze vs baking so often.
Hi Jordana,
Oh wow that’s quite a long time for kneading. I’d probably say about 10-12 minutes. Have you made a single batch? I’m curious how long you knead for a single. Also, if you don’t get completely to window pane, it’s ok. As long as it’s close. You want your dough to feel cohesive and soft – it shouldn’t easily tear. Also remember, the gluten will continue to develop during the first rise too – so the texture will feel quite different after. It will be much easier to handle. So glad your family enjoyed this recipe. Keep me posted on your next bake!❤️