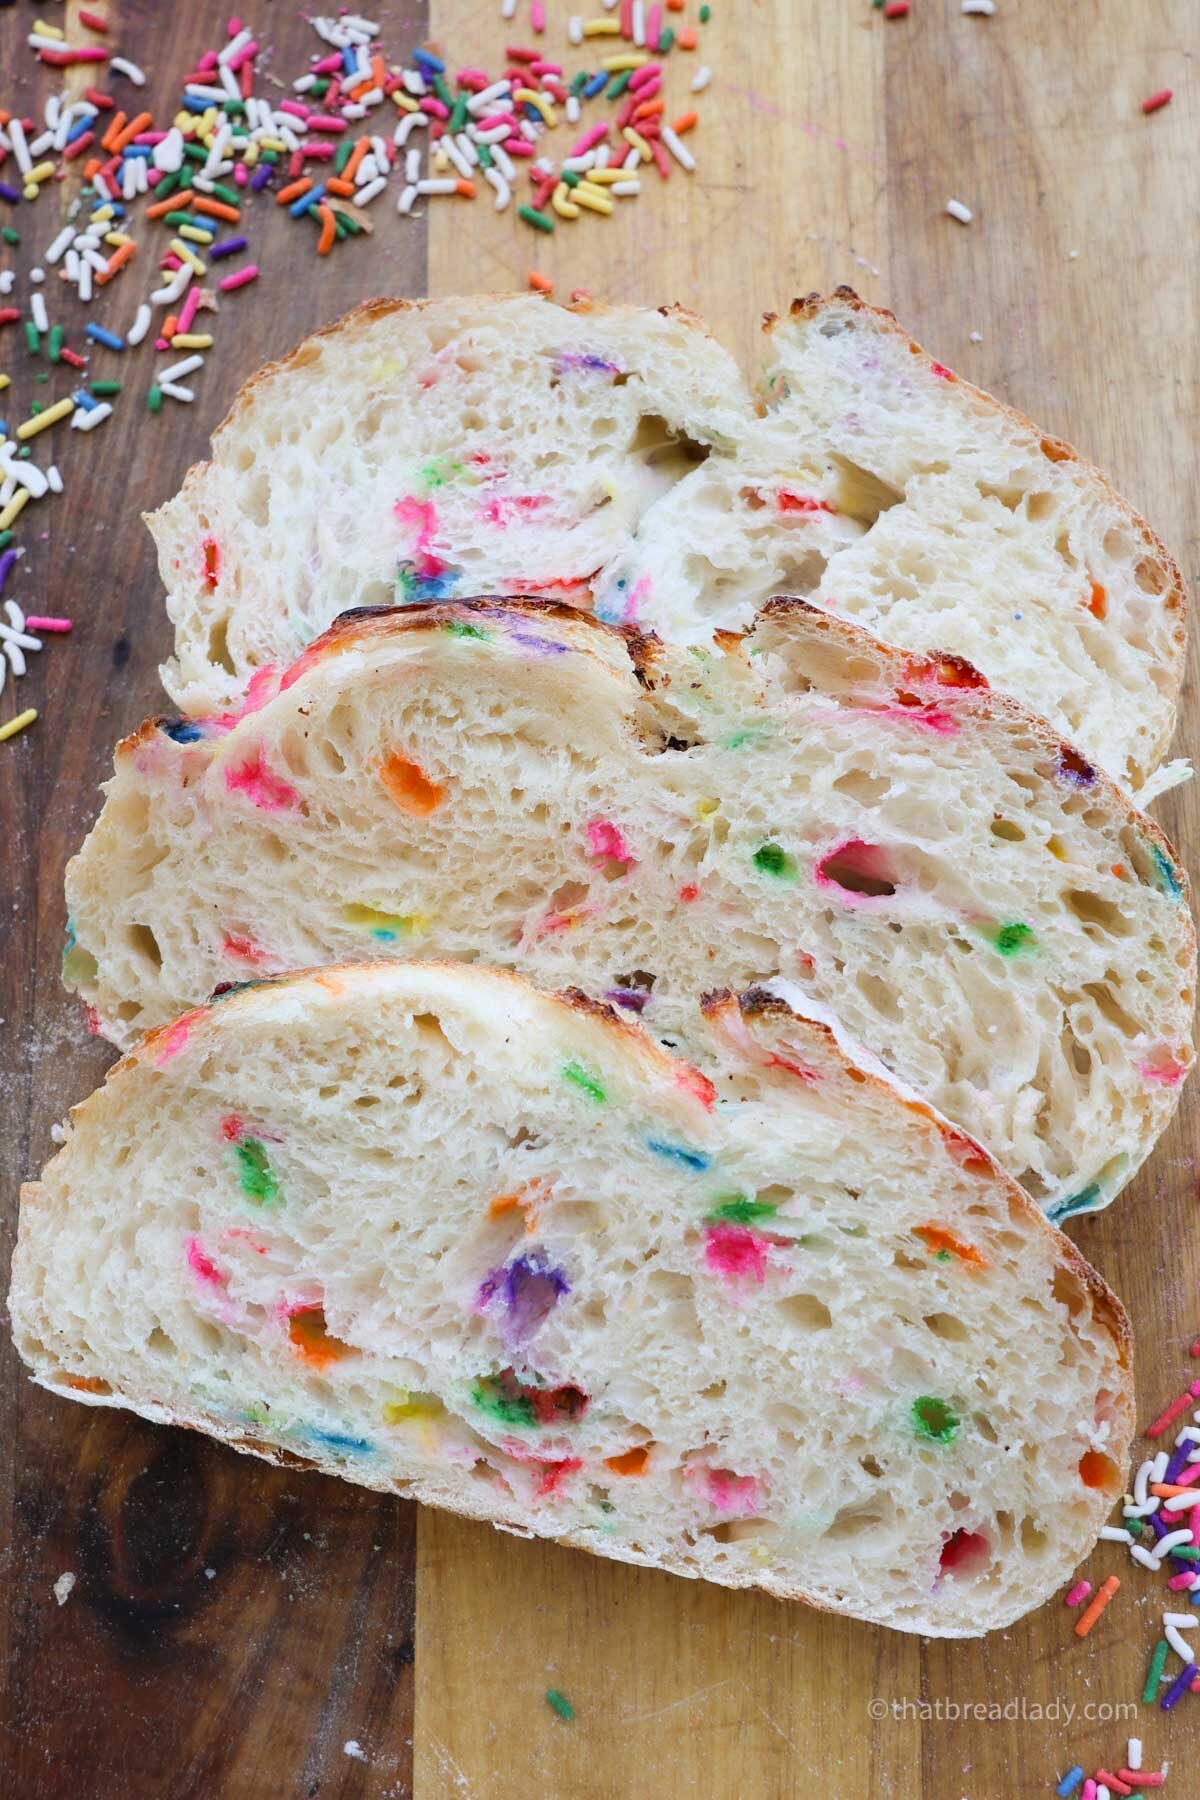
Funfetti Sourdough Bread
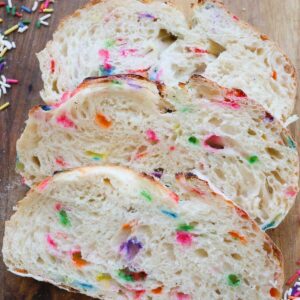
Baking this Funfetti Sourdough Bread is like making a birthday cake in a loaf form. The slight sourdough tang is balanced by a hint of lemon, a little sweetness, and bursts of colorful sprinkles. Every slice feels like a celebration. It’s playful and nostalgic—perfect for birthdays, holidays, or anytime you want to brighten an ordinary day. If you’ve been searching for fun sourdough recipes to share with family and friends, this one will quickly become a favorite.

Why you’ll love making Funfetti Sourdough Bread
- Nostalgic and pretty – It captures the fun of birthday cake in a homemade loaf.
- Colorful sprinkles – Every slice is filled with a rainbow of color.
- Perfect for celebrations – A unique celebration bread for birthdays, holidays, or special gatherings. Funfetti sourdough bread would make such a fun birthday gift to a friend or neighbor.
- Sweet with a twist – Just like in my Blueberry Scones with Lemon Glaze, it has a hint of lemon and a touch of sweetness.
- A super cute bread – Both kids and adults will love it. Even Taylor Swift says she loves to make sourdough with sprinkles!
- Fun sourdough recipe – A playful way to experiment beyond traditional loaves.
- Impressive yet simple – Like my Strawberry Cream Cheese Pastries, this bread looks bakery-worthy but is approachable enough for home bakers.
Table of contents
A good sourdough starter is the foundation of incredible bread!
how to create a sourdough starter
Important Ingredients
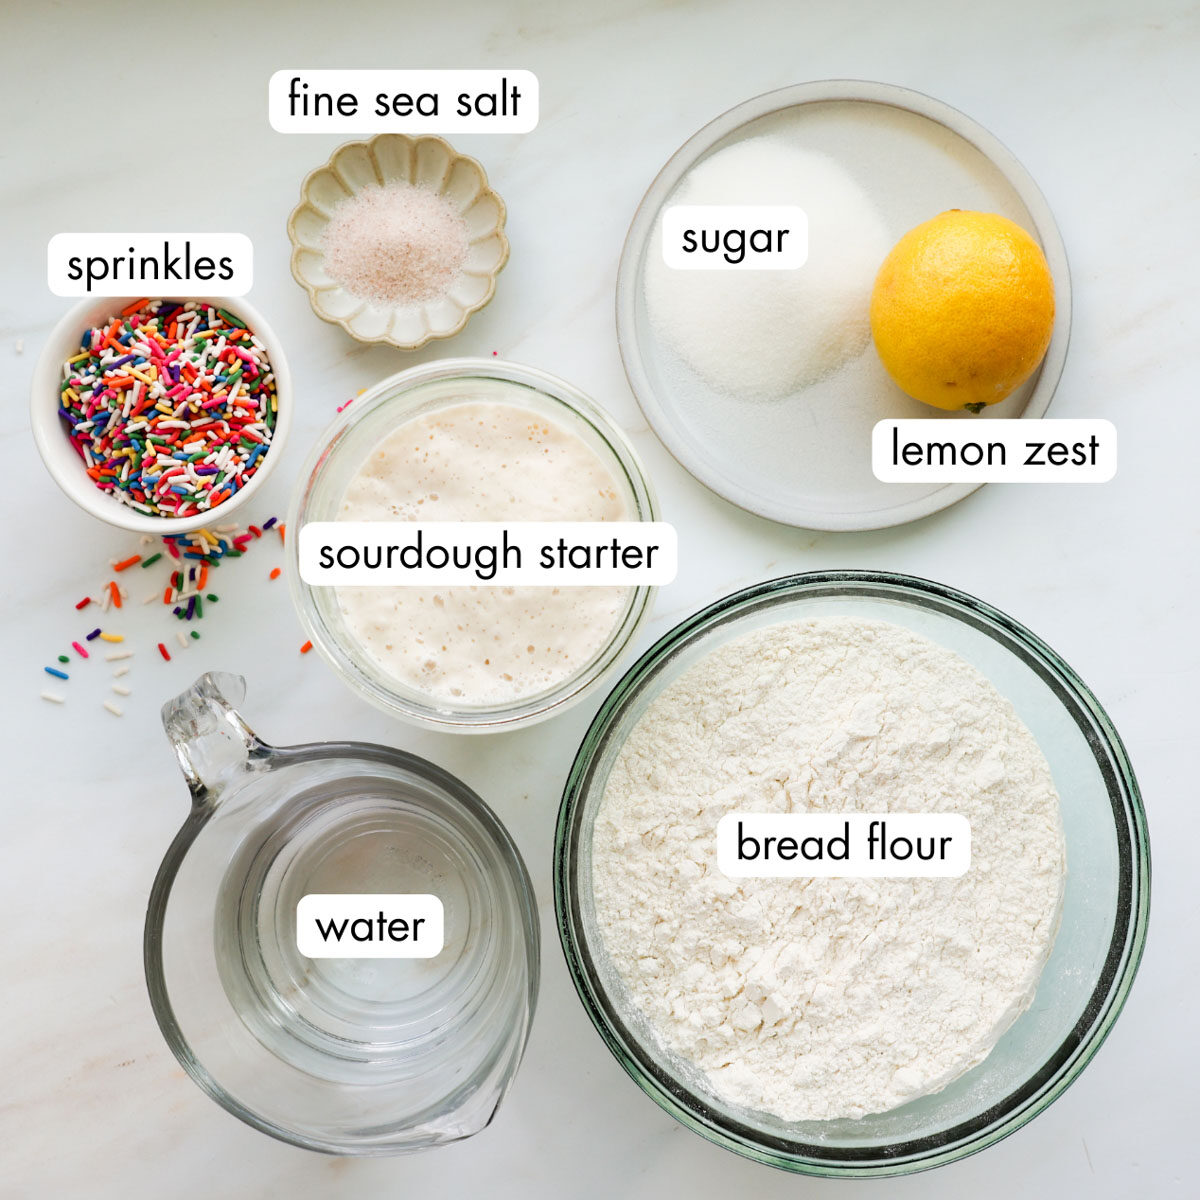
- Ripe sourdough starter – When making authentic sourdough bread, always use bubbly sourdough starter when it’s at its peak.
- Sugar – Adding a little bit of sugar adds a slight sweetness that pairs really well with the lemon and sprinkles.
- Lemon Zest – Adds a burst of flavor. When combined with the sprinkles, it’s giving birthday cake flavor! Try my Lemon Olive Oil Cake Loaf if you love lemon treats!
- Sprinkles – Use colorful jimmie sprinkles like the kind you’d put on Soft Sugar Cookies.
- Flour – To make sourdough bread recipes easy, I recommend using bread flour because of its high protein content. Higher protein flours are effective at developing a strong gluten structure, which will allow the bread to hold its shape and rise as it bakes. Use bread flour for fluffy French Bread.
See the recipe card for the full list of ingredients and instructions.
Substitutions and Variations
- Lemon Zest – You can leave this out, but it really adds that kind of birthday cake flavor. Lemon recipes are so flavorful, like my glazed lemon loaf.
- Sprinkles – Jimmie sprinkles (the long tube-like shaped sprinkles) are best for this bread. Don’t use nonpareils as they will soak into the bread, and you won’t get a very colorful loaf. I love to use jimmy sprinkles on my Sourdough Sugar Cookies too!
- Sugar – You can make this sourdough bread without sugar, but it won’t have that slightly sweet flavor that pairs so well with the sprinkles. Do not substitute with a liquid sweetener like honey – this will affect the hydration level of the dough.
- Flour – I would not substitute with all-purpose flour. Bread flour is best for sourdough bread. I suggest using a high protein bread flour with a 13% or higher protein content. However, you could also use a regular bread flour like King Arthur, which has 12.7% protein.
Sourdough Timeline
This is a sample baking timeline to help you get an idea of how this recipe will go for you. Since this is a two day process, having a timeline can help you plan your baking. Note: You can also bake this loaf the same day instead of overnight cold proofing it. See the recipe notes for same day baking instructions.
| The night before: | |
| 9:00 pm | feed starter with 100% hydration |
| The next morning: | |
| 9:00 am | Fermentolyse: Mix together the lemon zest, sugar, water, and ripe sourdough starter. |
| 9:30 am | add salt and 20g water |
| 10:00 am | Stretch & Fold 1 (Beginning of Bulk Fermentation) |
| 10:30 am | Stretch & Fold 2 |
| 11:00 am | Stretch & Fold 3 – Add half the sprinkles. |
| 11:30 am | Stretch & Fold 4 – Incorporate the rest of the sprinkles. |
| 11:35 am – 2:30 pm | complete Bulk Fermentation – let dough rise |
| 2:30 pm | pre shape |
| 3:00 pm | shape & cold proof |
| The next day: | |
| 9:00 am | score & bake |
How to make Funfetti Sourdough
Mixing the dough
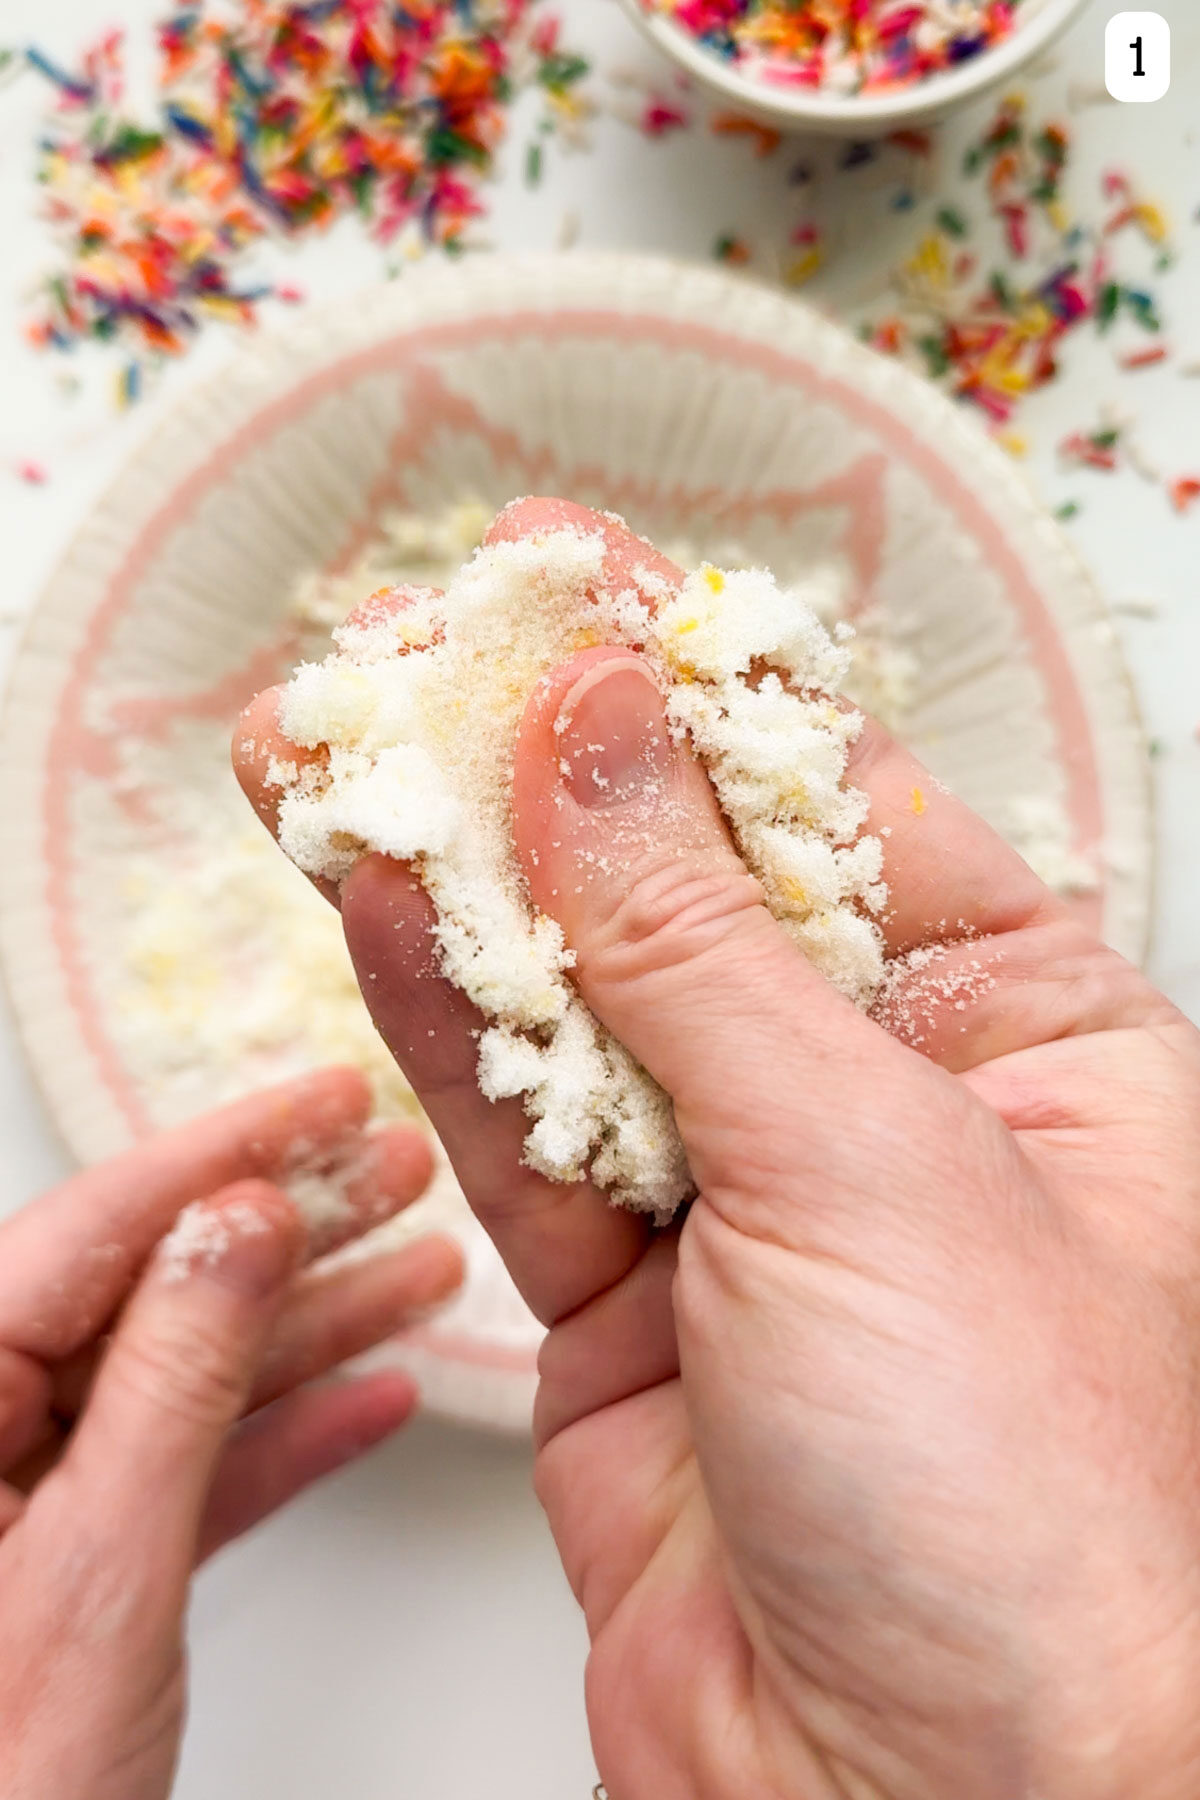
Step 1: Combine the sugar and lemon zest by rubbing them together between your fingers.
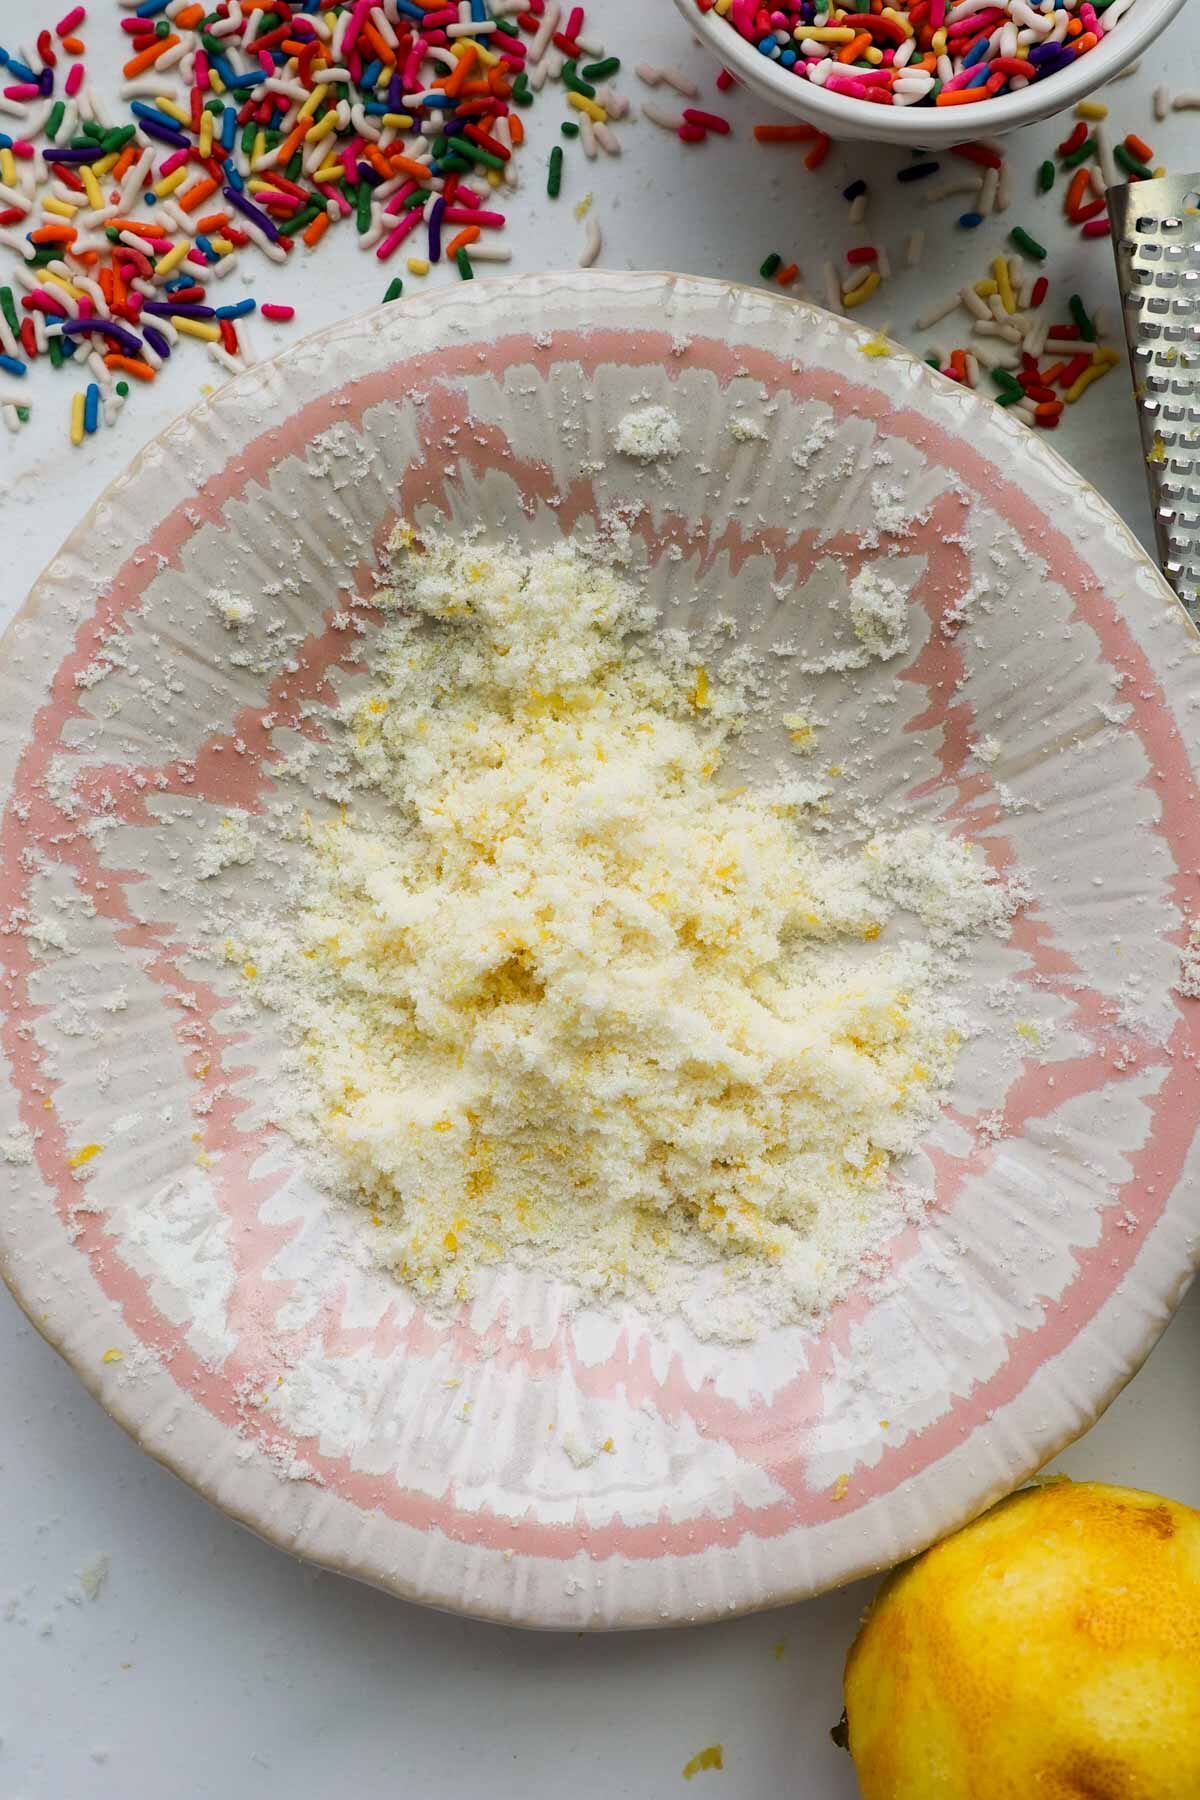
This releases the flavor of the lemon and makes it much more concentrated.
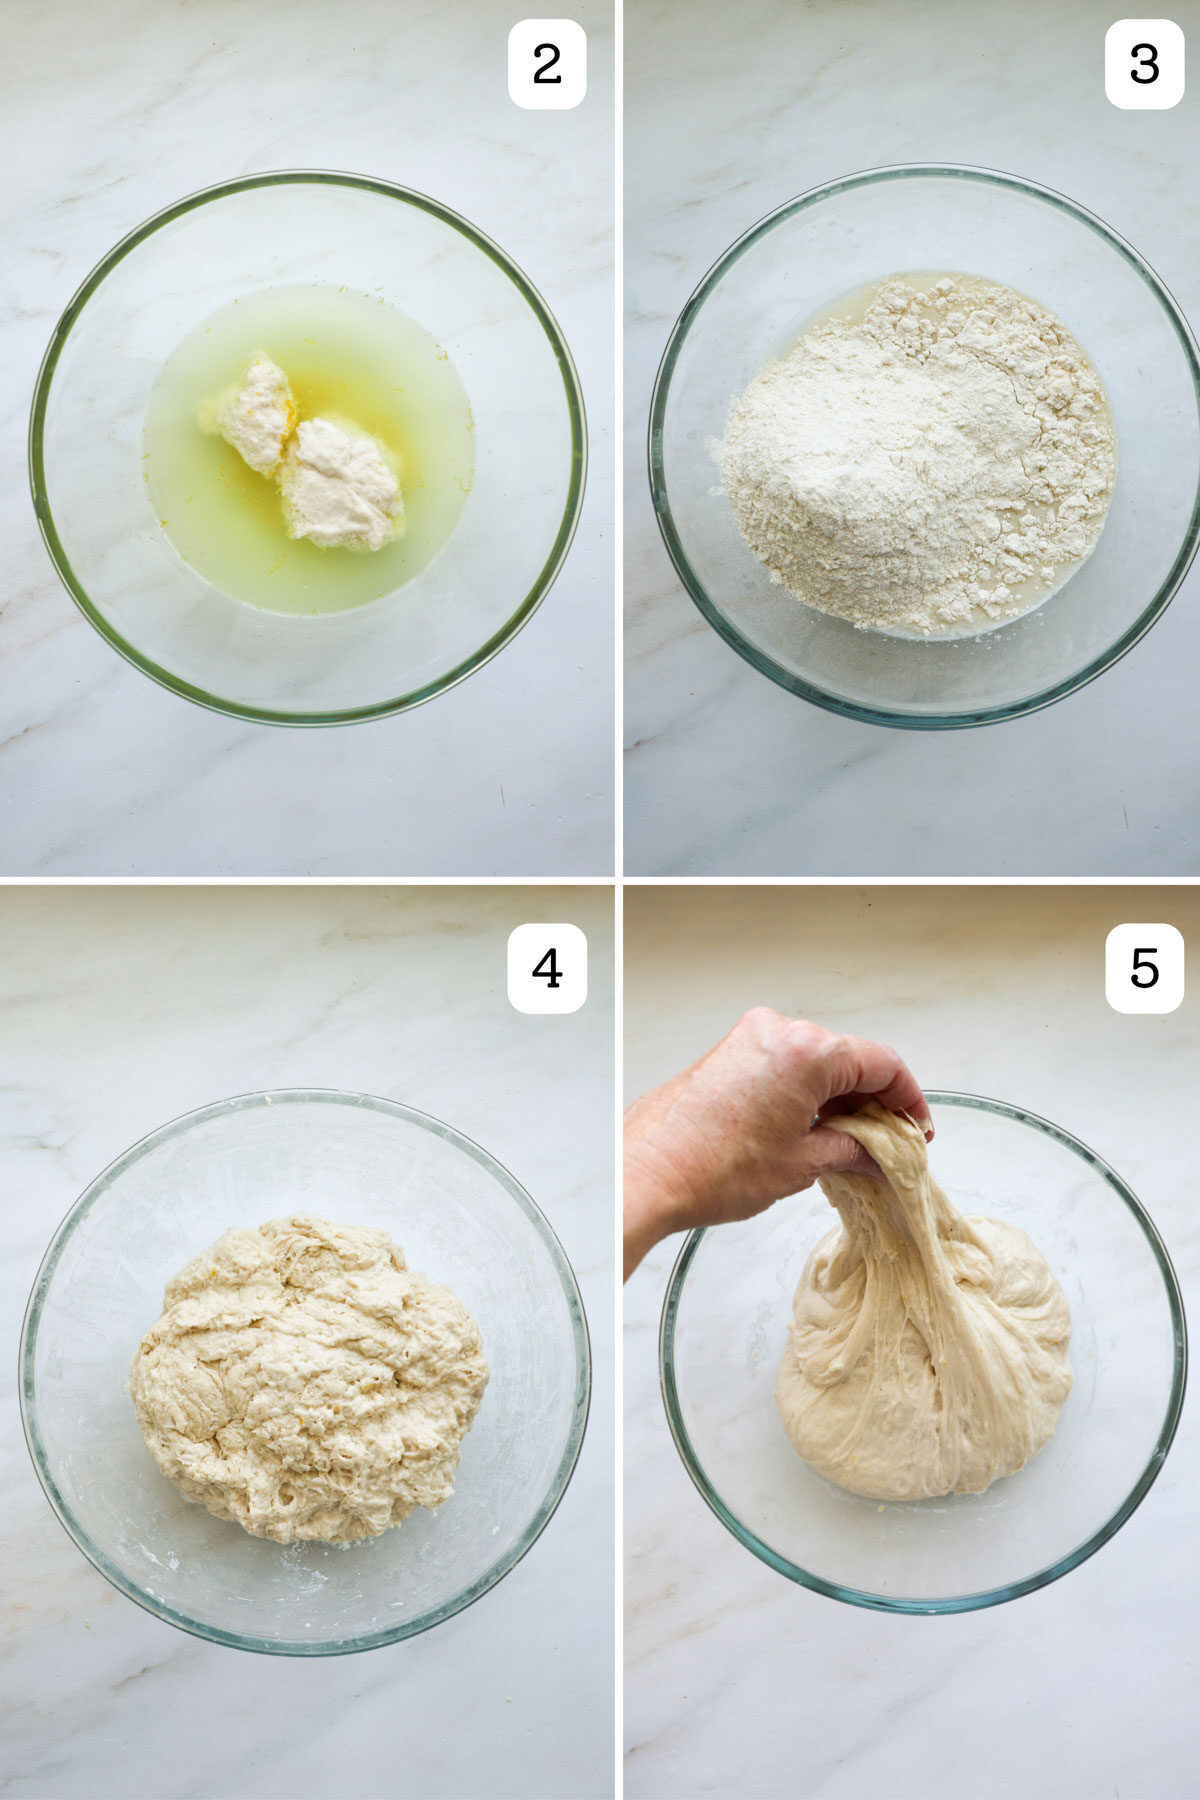
Step 2: Combine the lemon zest, water, and sourdough starter. Step 3: Add the bread flour. Step 4: Then mix the dough together until no dry bits of flour remain. Cover and let it rest for 30 minutes. Step 5: Uncover the dough. Notice how the gluten has already begun to develop.
Stretch & Fold: After the dough has been mixed and rested for 30 minutes, you’ll spend the next 90 minutes developing the dough through a total of 4 series of stretching and folding. It’s a small action that has a big result. This gentle form of kneading develops the gluten in the dough, which results in a bread that holds its shape as it rises and bakes.
Stretch and Folds
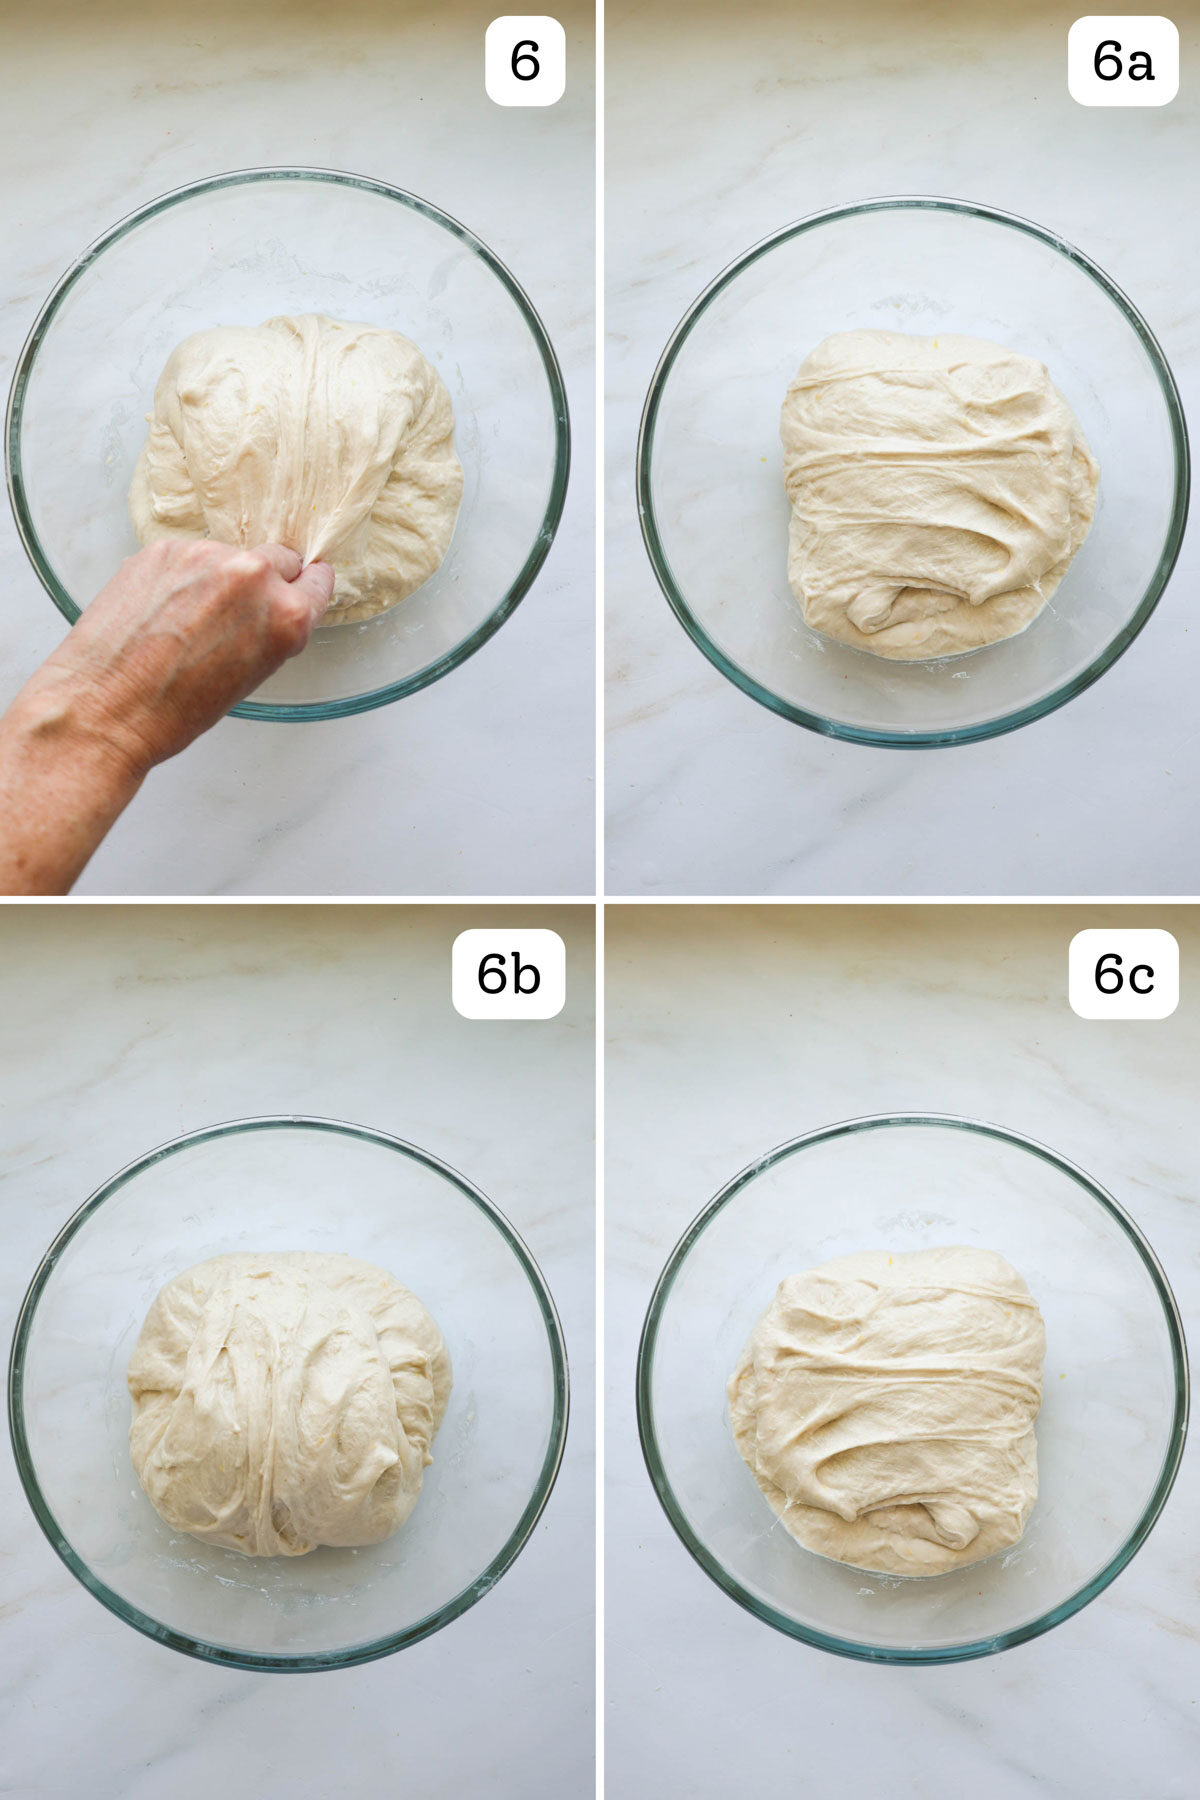
For Stretch & Fold 1 – Step 6: Pull the top of the dough up and over to the opposite side. Step 6a: Pull the left side up and fold it over to the opposite side. Step 6b: Pull the bottom side of the dough up and fold it over. Step 6c: Pull the right side up and fold it over. This is one complete series. Cover the dough and let it rest for 30 minutes.
Incorporating the sprinkles
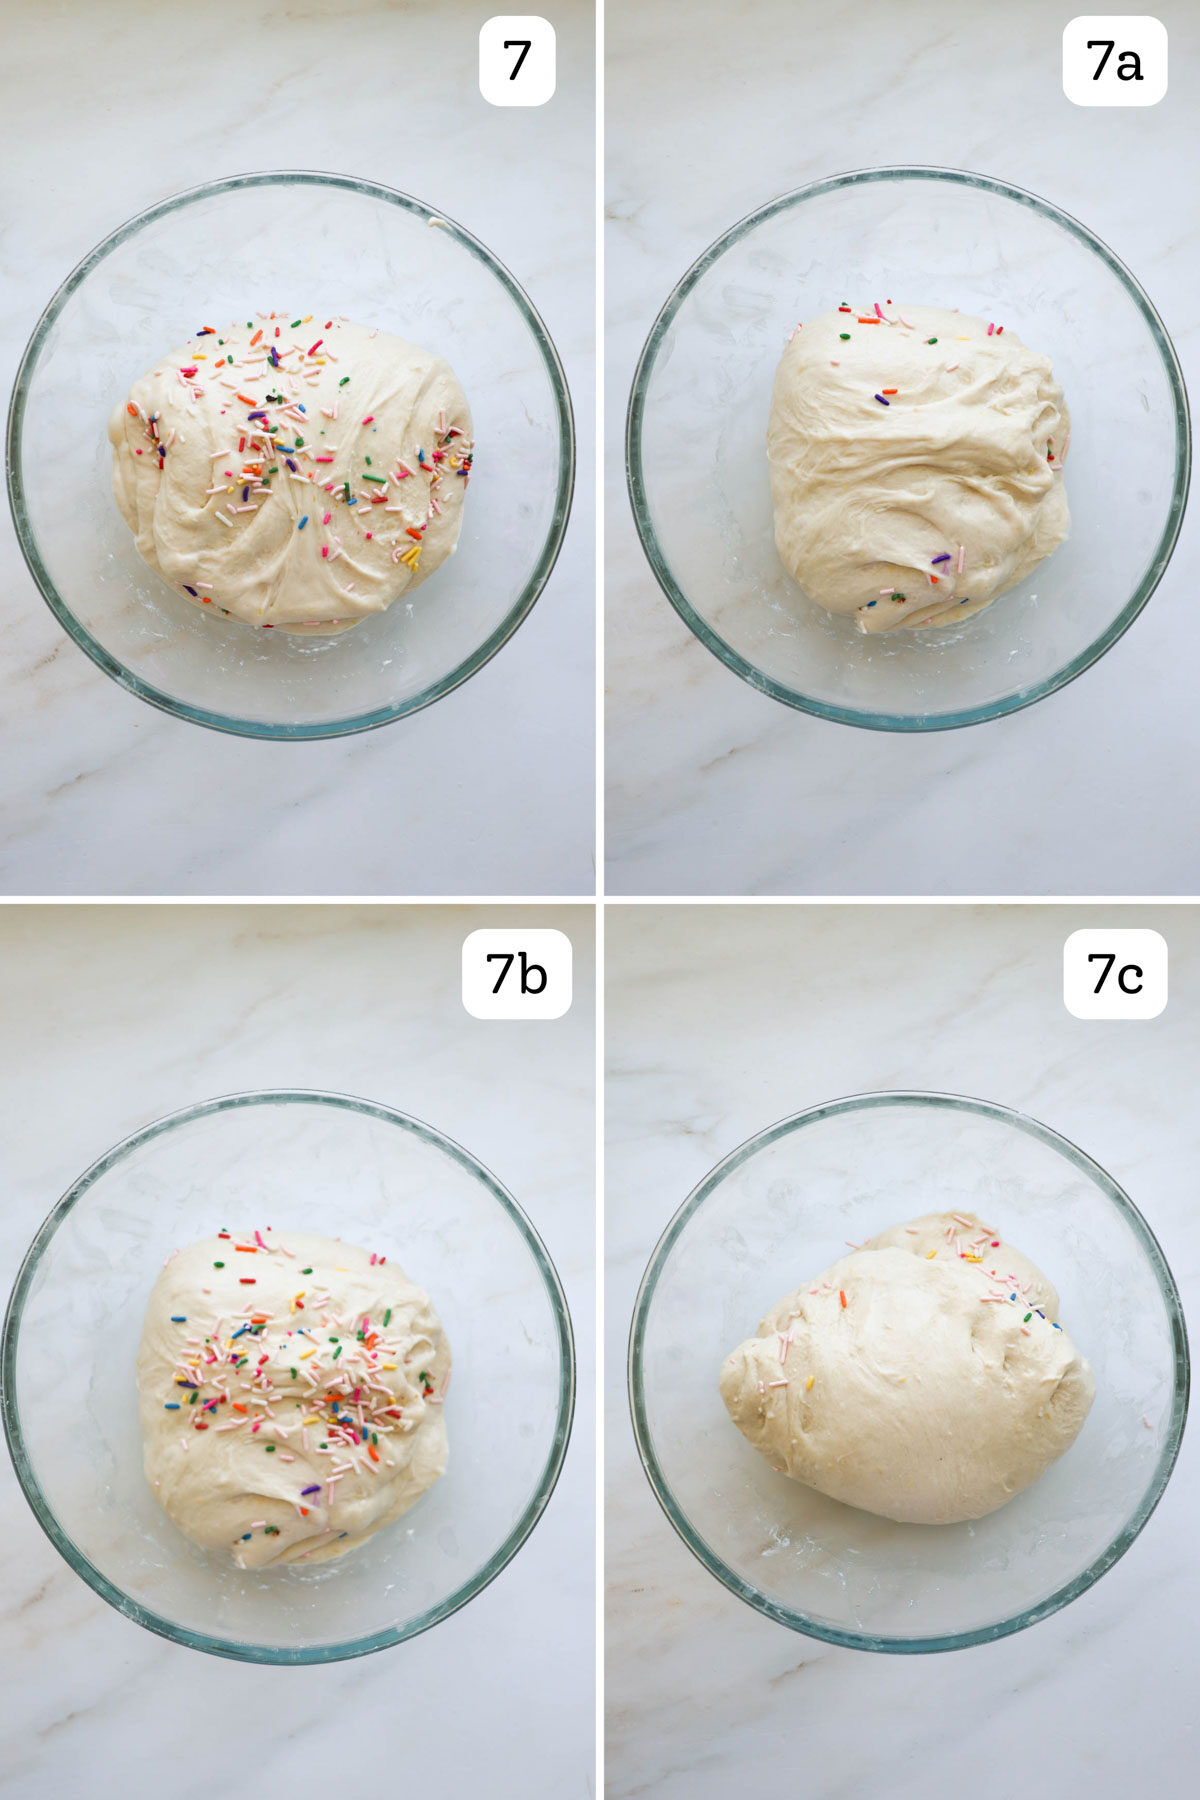
Step 7, Stretch & Fold 2: Incorporate half the sprinkles in this series. Sprinkle some on top of the dough. Step 7a: Fold the top over to the opposite side. Step 7b: Sprinkle more sprinkles on top. Step 7c: Fold the bottom side of the dough up and over. Then stretch and fold the right side if the dough will allow it. Sometimes the gluten is too tight for four total folds. Cover and let rest for 30 minutes. Steps 8 and 9: Complete two more sets of Stretch and Fold.
Bulk Fermentation
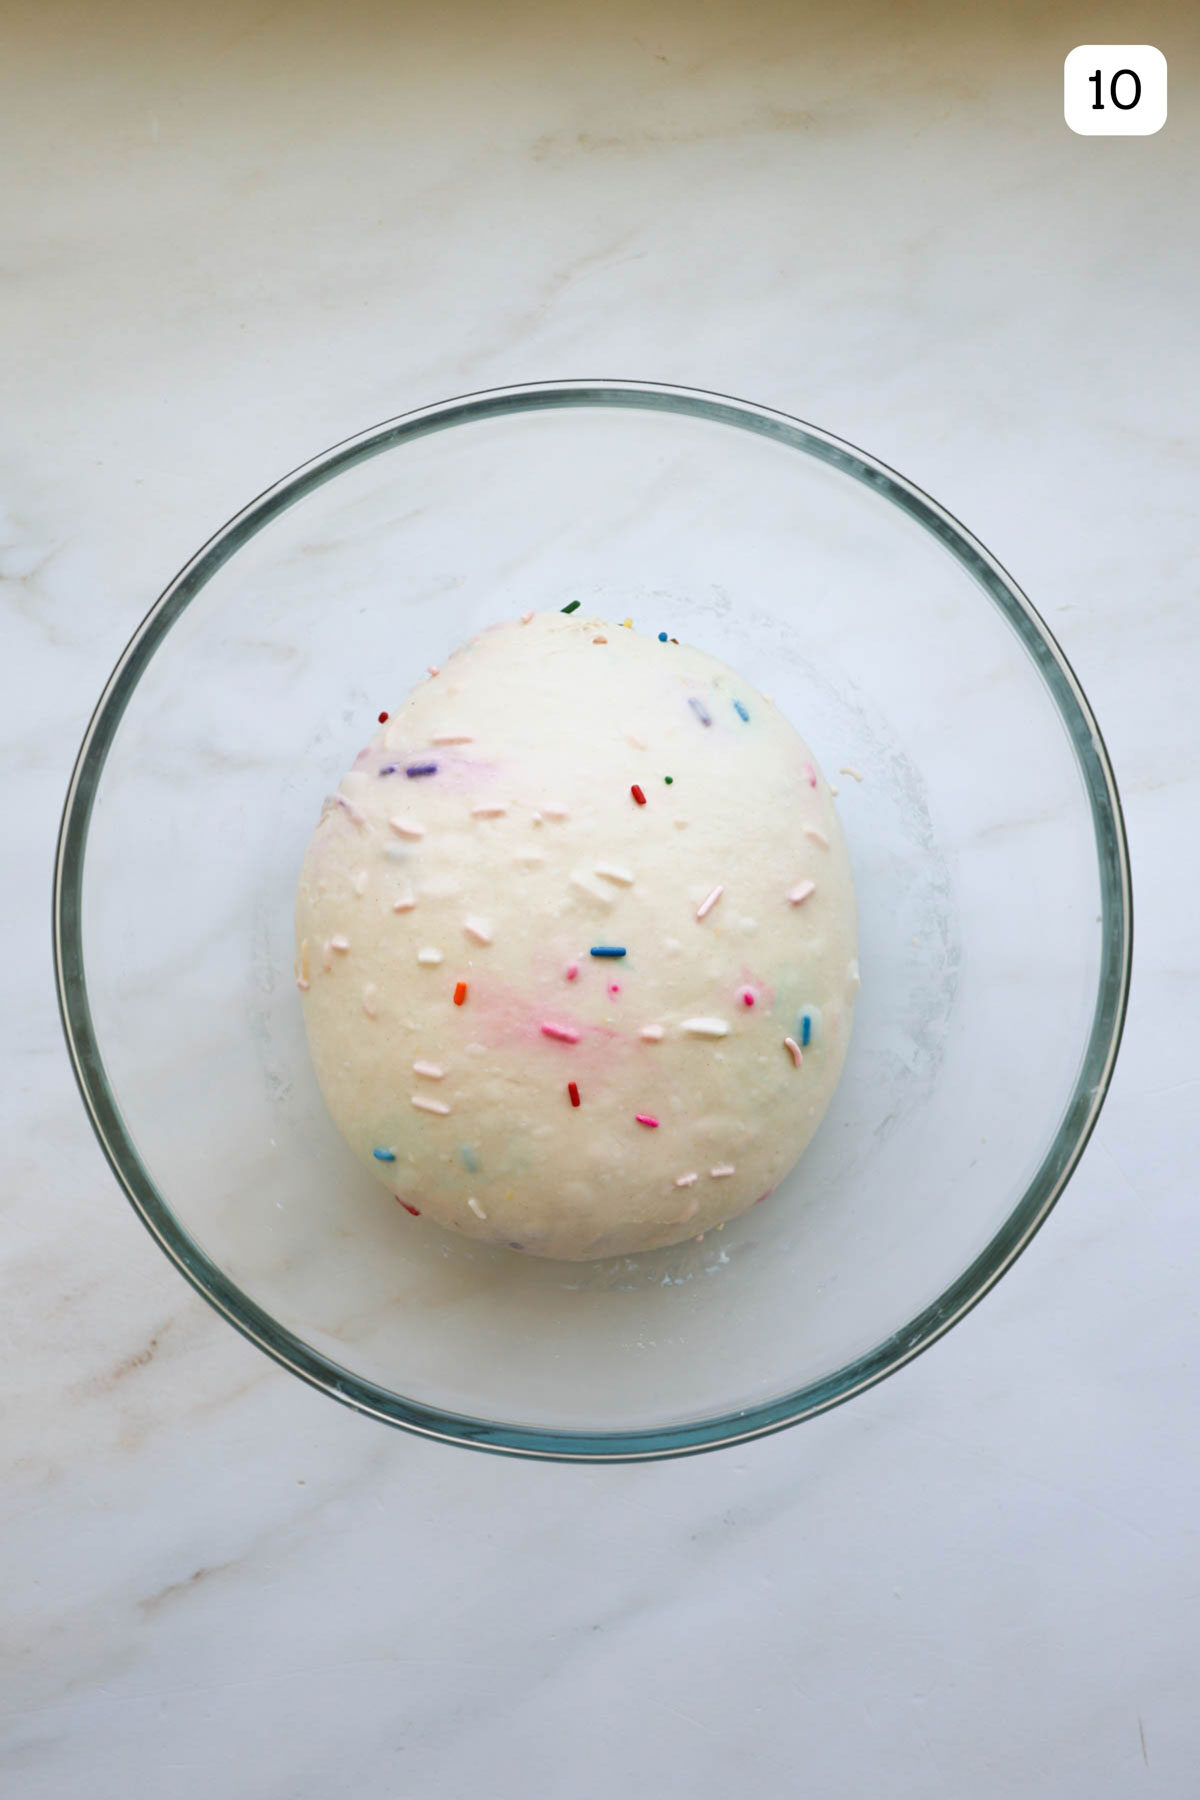
Step 10: After the 4th stretch and fold, cover and let rest for the remainder of bulk fermentation. At a dough temperature of 78-80°F, this will take about 3 hours.
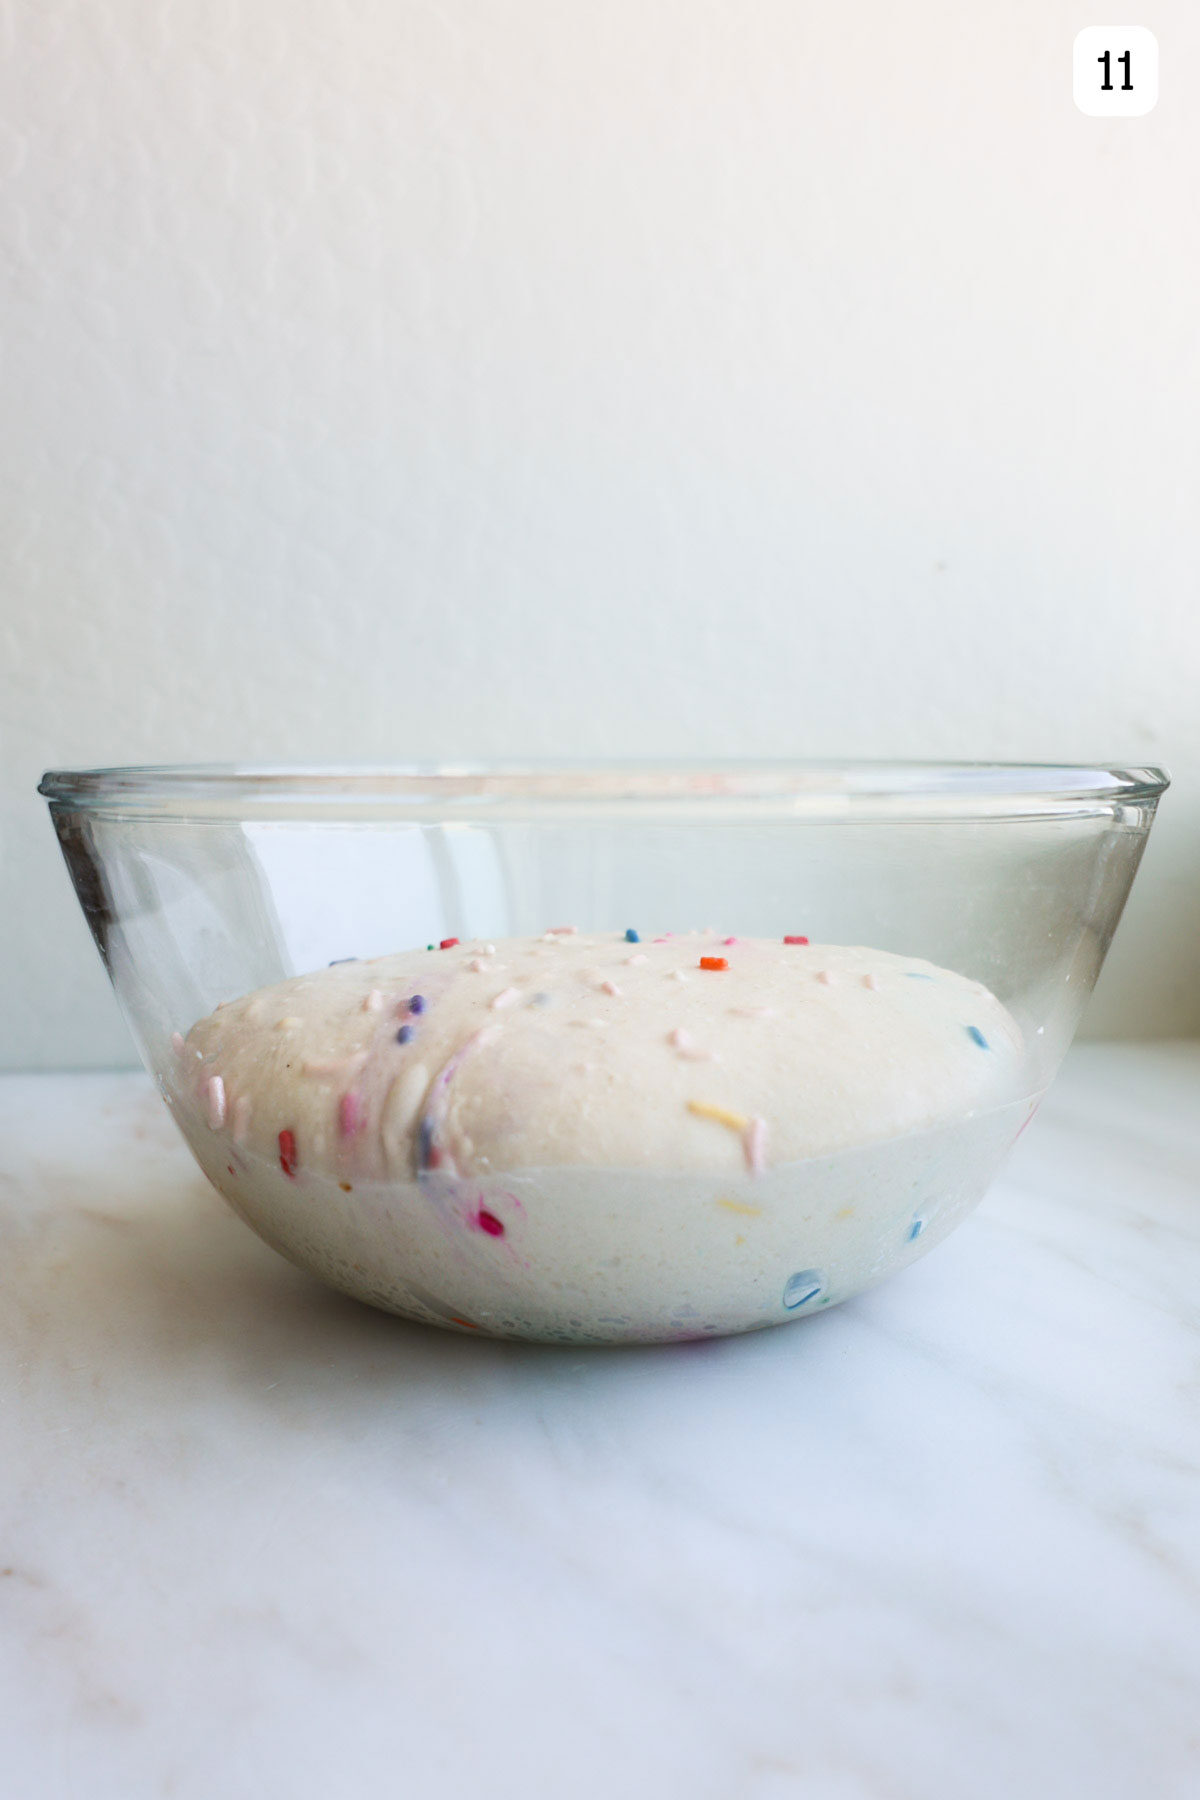
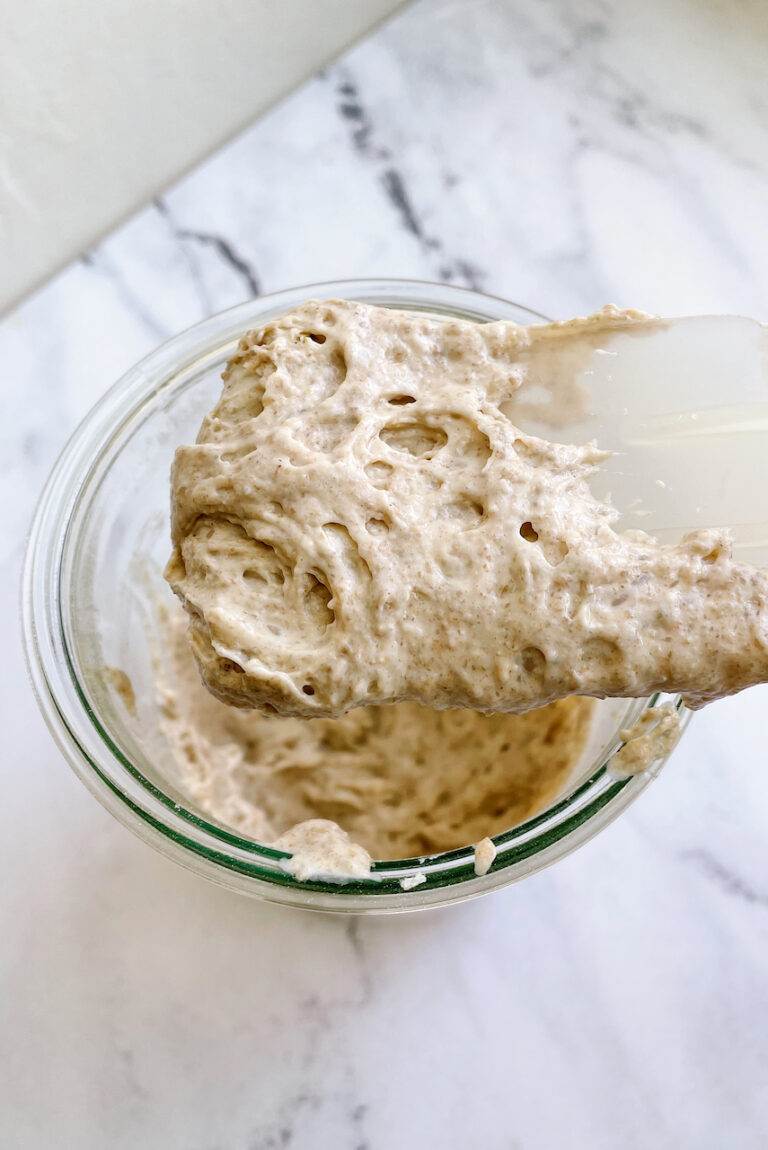
Step 11: Bulk Fermentation is done with the dough has increased in volume about 40% and has bubbles throughout. Using clear bowls like this helps you see the progress of your dough.
A note about Bulk Fermentation: This is perhaps one of the most difficult steps for sourdough baker’s to conquer. It requires baker’s intuition and getting to know your dough. The most obvious signs that bulk fermentation is done: the dough has risen 30-40% in volume, it pulls away from the bowl easily, there are bubbles throughout and on top of the dough, and the dough jiggles when you slide the bowl back and forth.
Also, you can use the poke test: gently poke the dough with your finger and it will do one of three things:
- if it leaves an indent that slowly springs back, it’s ready for pre shaping
- If the dough doesn’t leave an indent and still feels rather dense, it needs more time to rise.
- If it leaves an indent that never springs back, the dough has over proofed and you should shape it and cold proof right away.
The poke test is really effective for non sourdough bread recipes too like my Honey Whole Wheat Bread and Cinnamon Rolls with Cream Cheese Frosting.
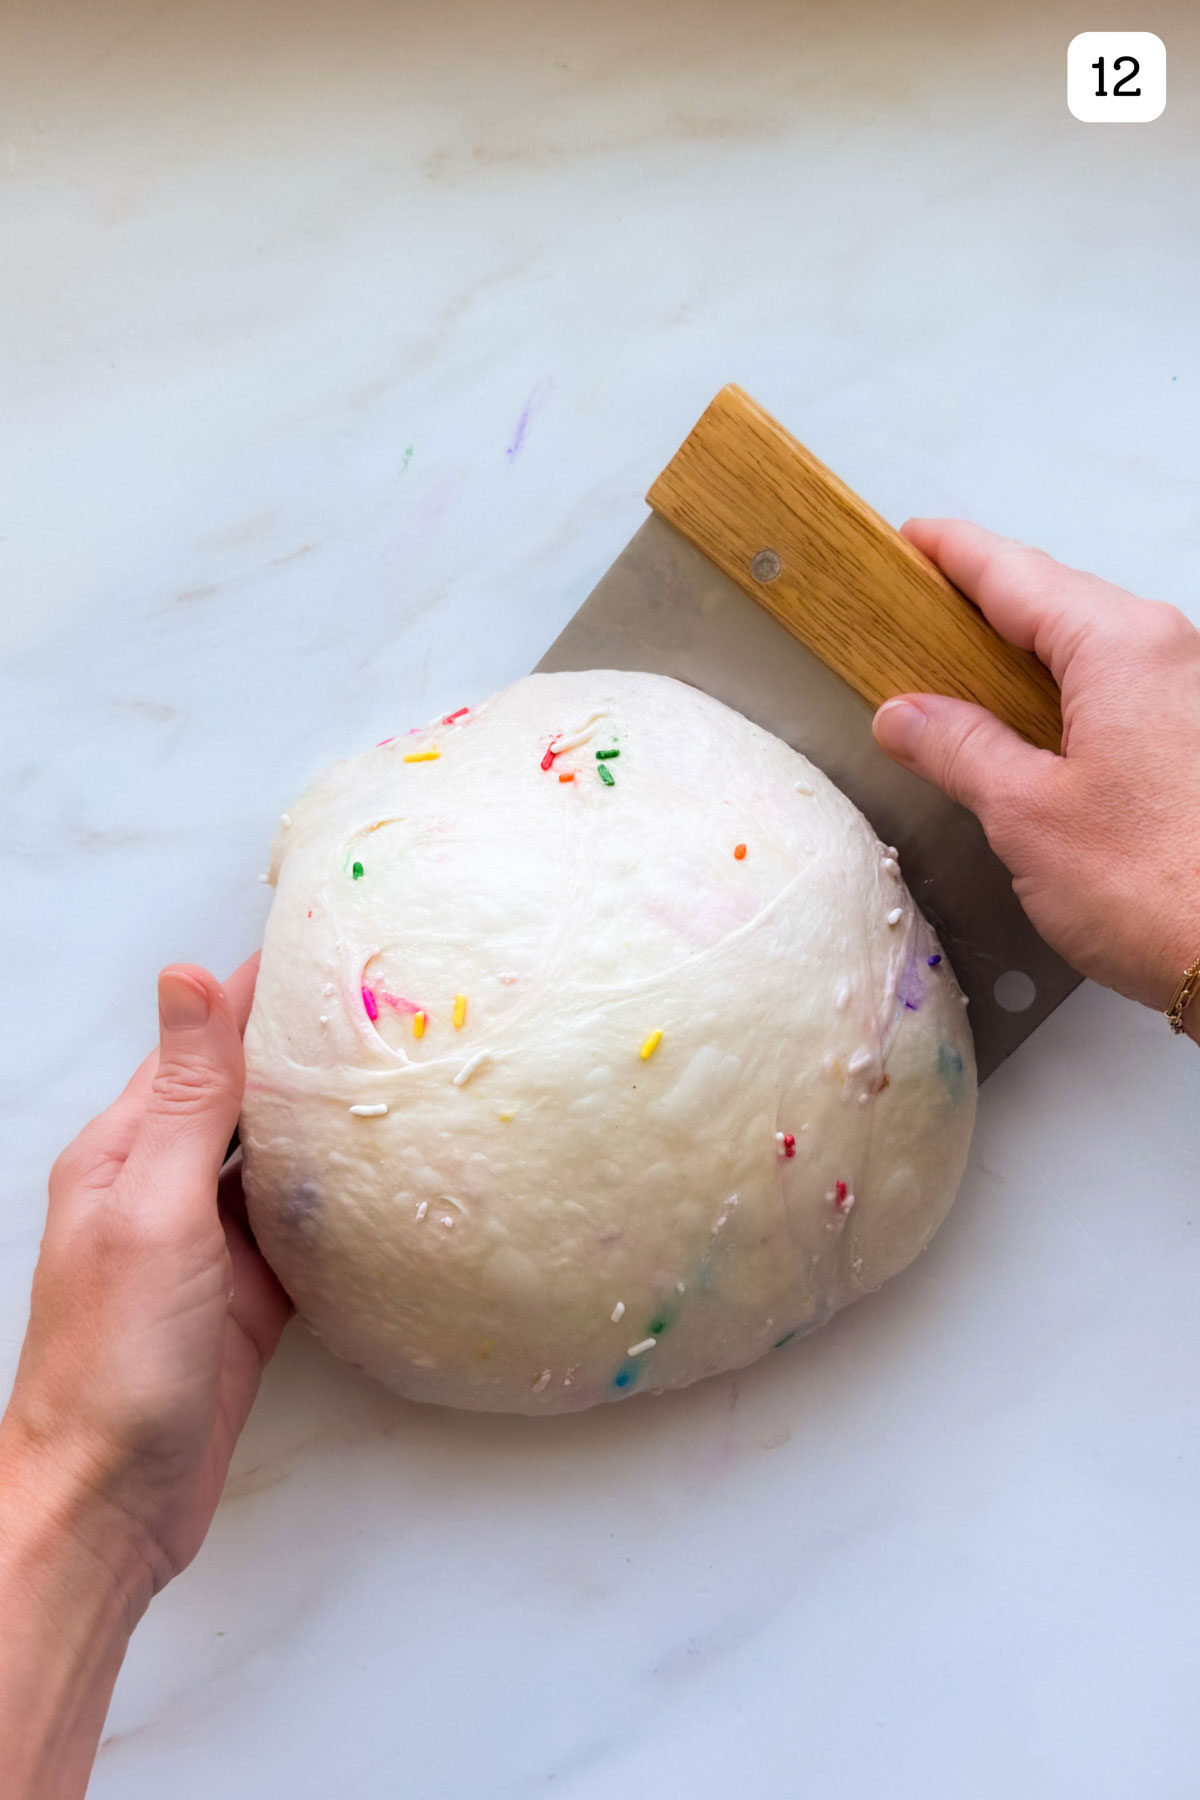
Step 12, Pre Shape: Turn out the dough. Wet your hands with water to keep your fingers from sticking to the dough. Using the bench knife, round the dough until it forms a ball.
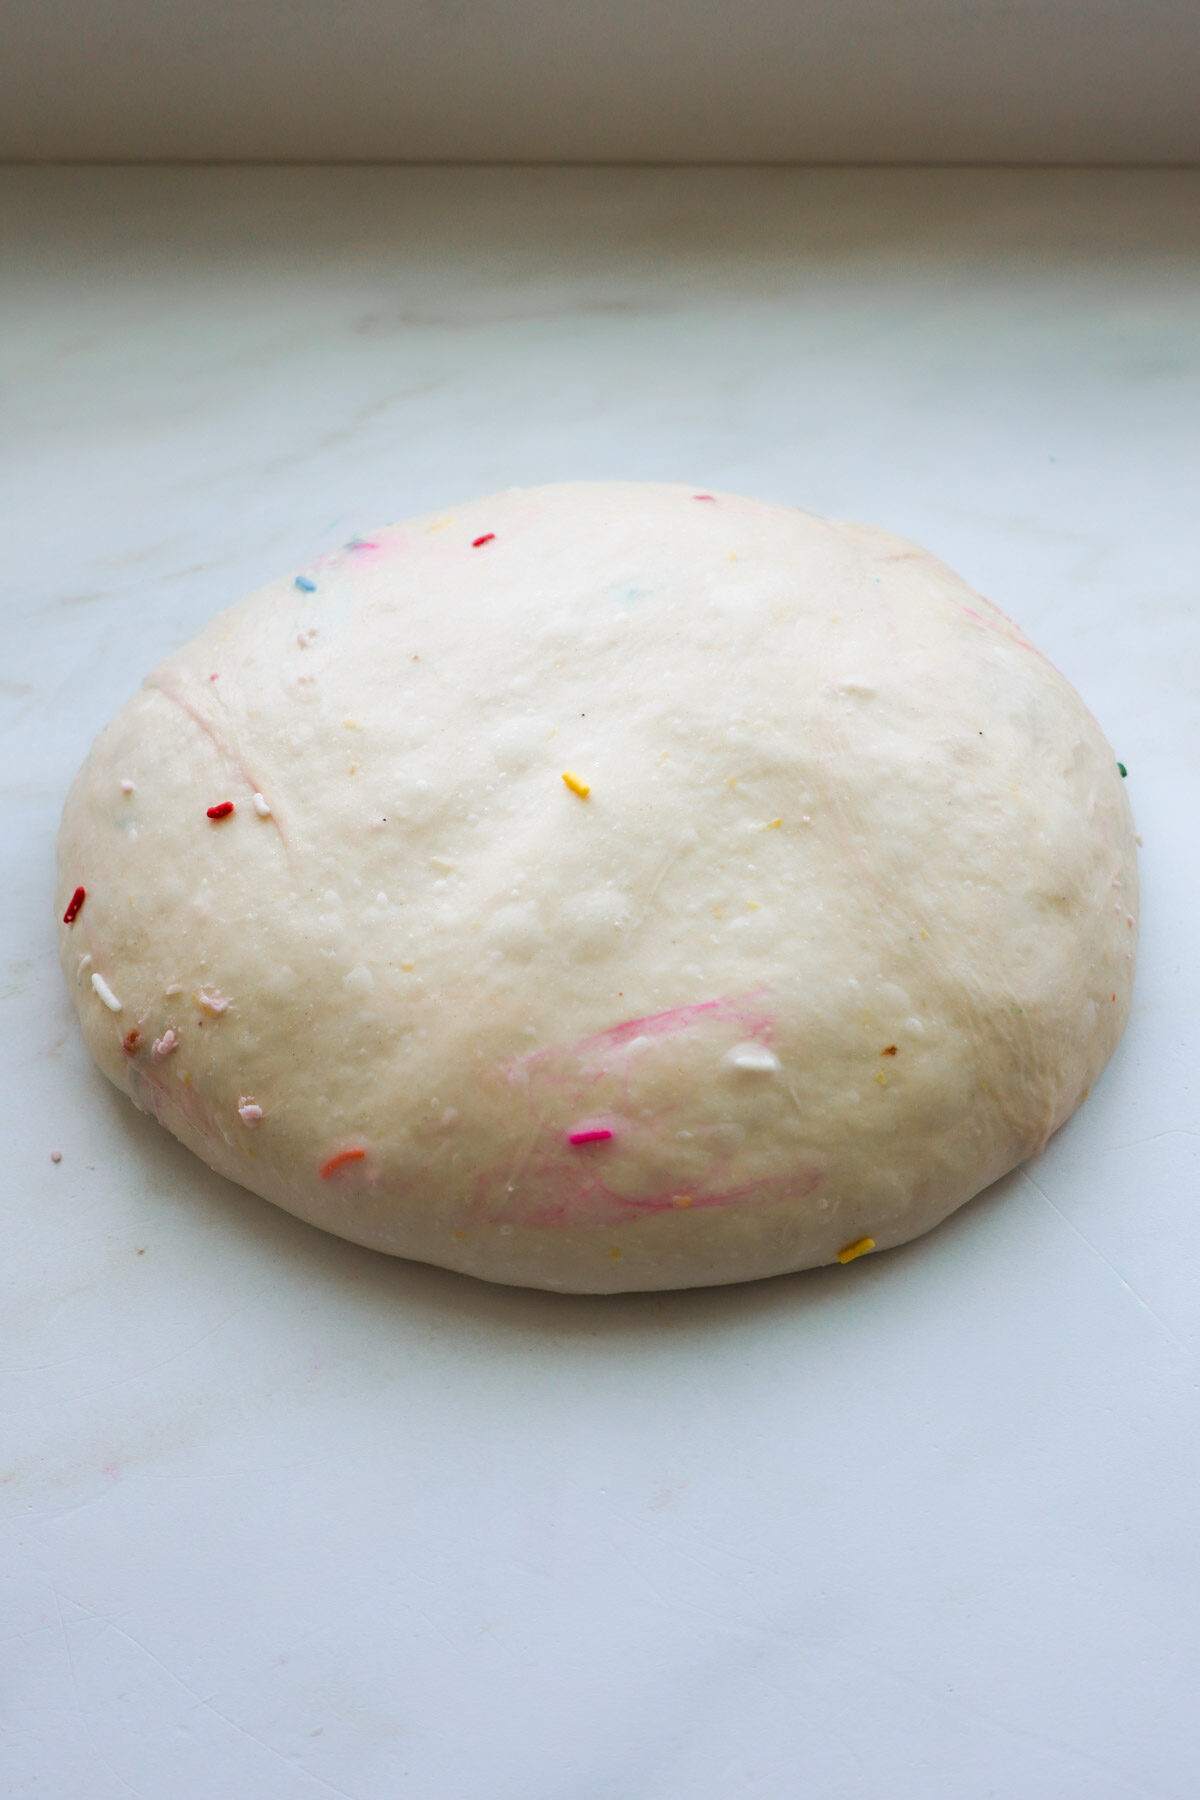
After resting for 30 minutes, the dough will relax and slightly flatten out.
Shaping
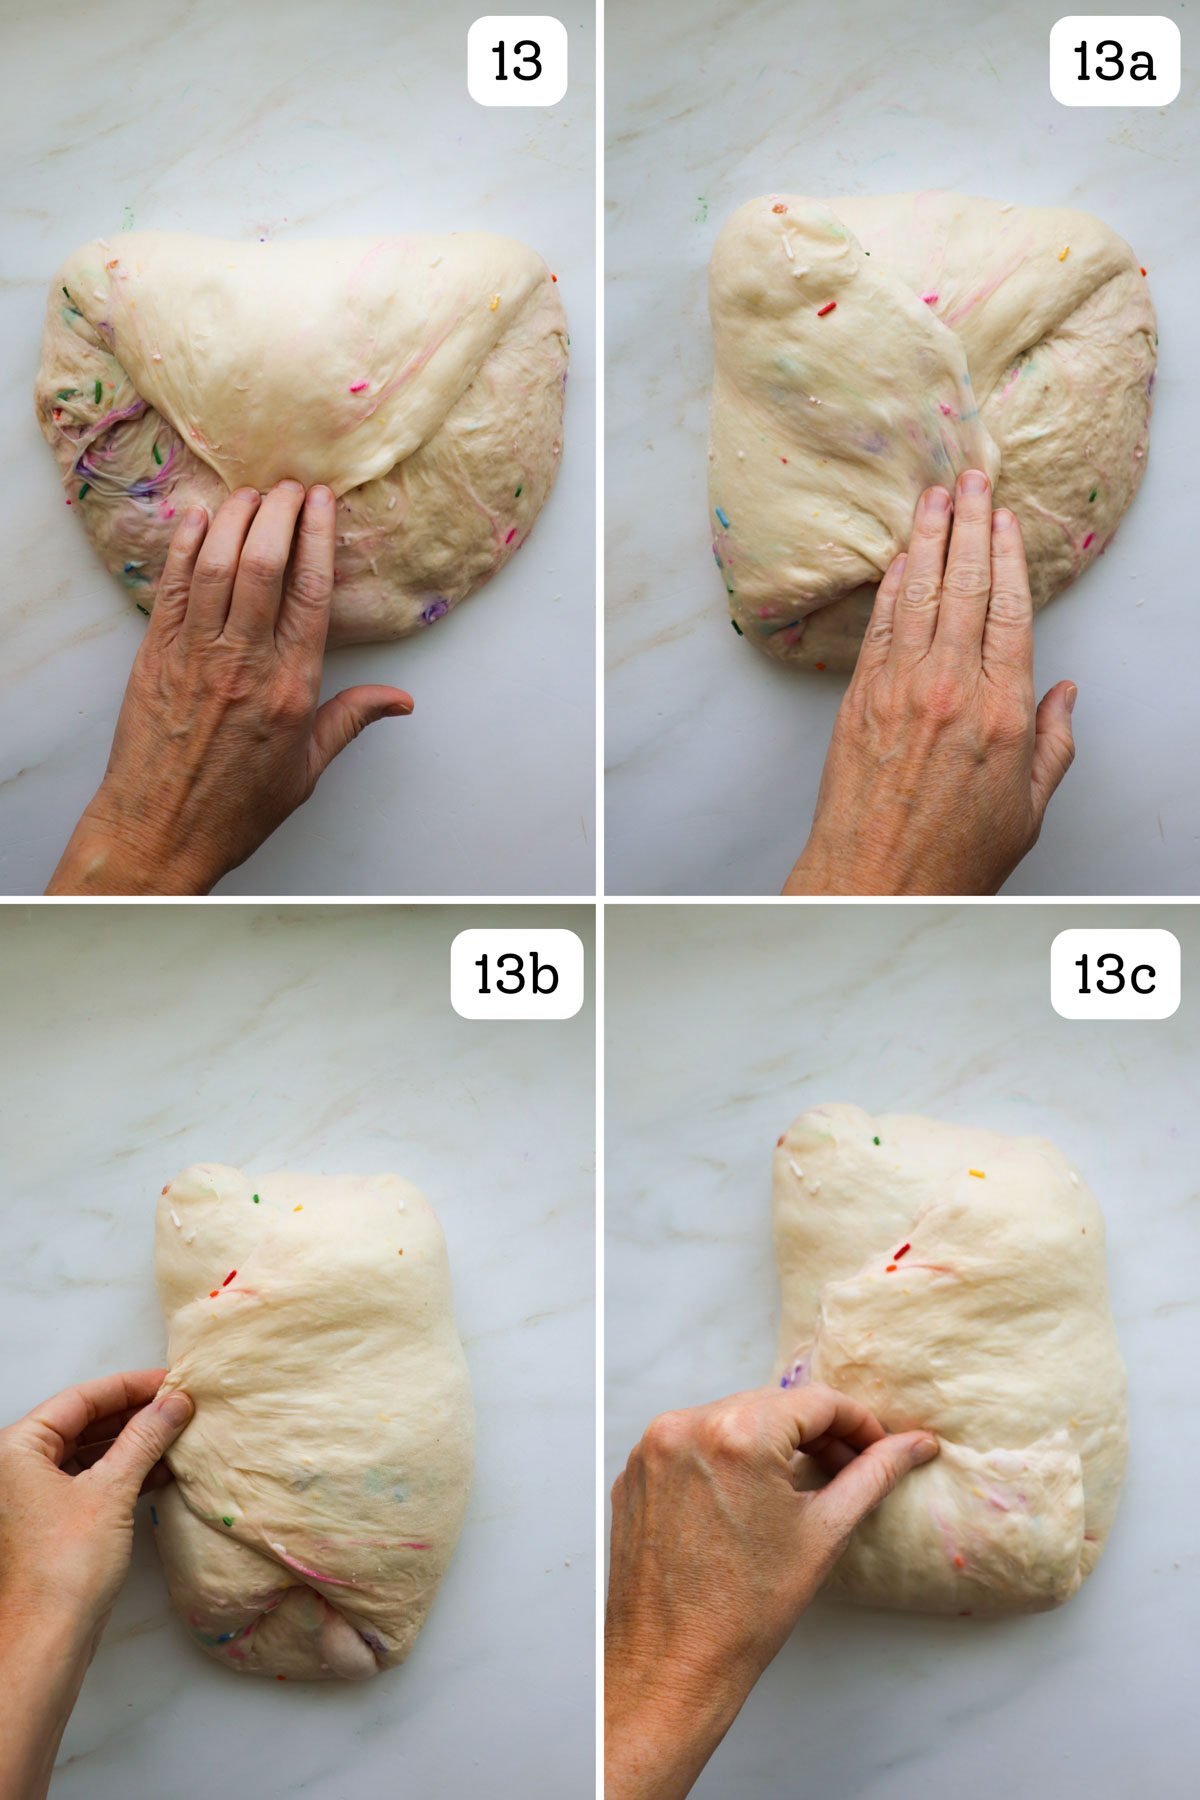
Now it’s time for final shaping. First, flip the dough so the smooth side is facing down. Step 13: Fold the top of the dough over and press down to keep it in place. Step 13a: Fold the left side over. Step 13b: Fold the right side of the dough over that. Step 13c: Roll the dough up from the bottom, forming a loaf. Drag the loaf back towards you, tightening the outside. Then pinch the ends shut if needed.
Baking
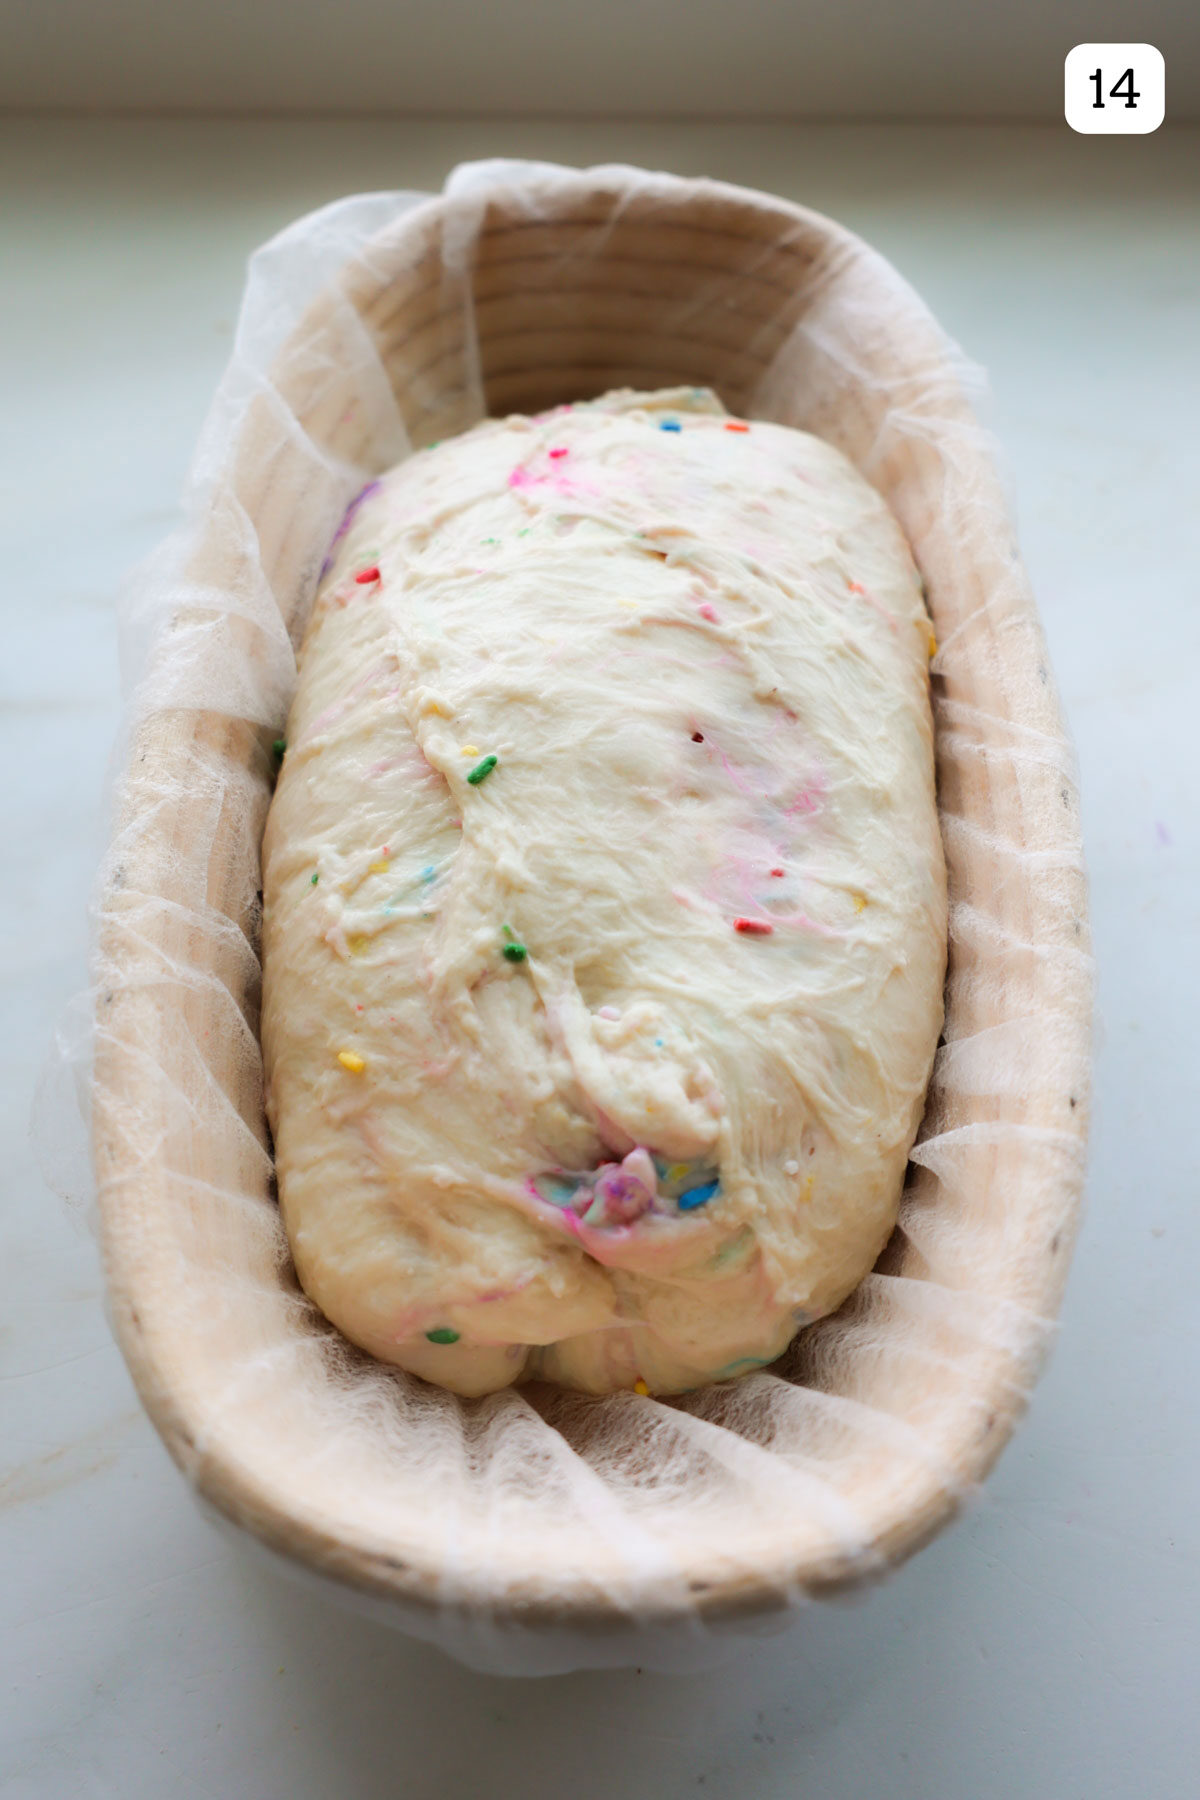
Step 14: Place the loaf, seam side up, in a prepared banneton. I like to use these hair nets – no flour needed, it won’t stick to the dough. Cover the loaf and cold proof at least 12 hours or up to 48 hours.
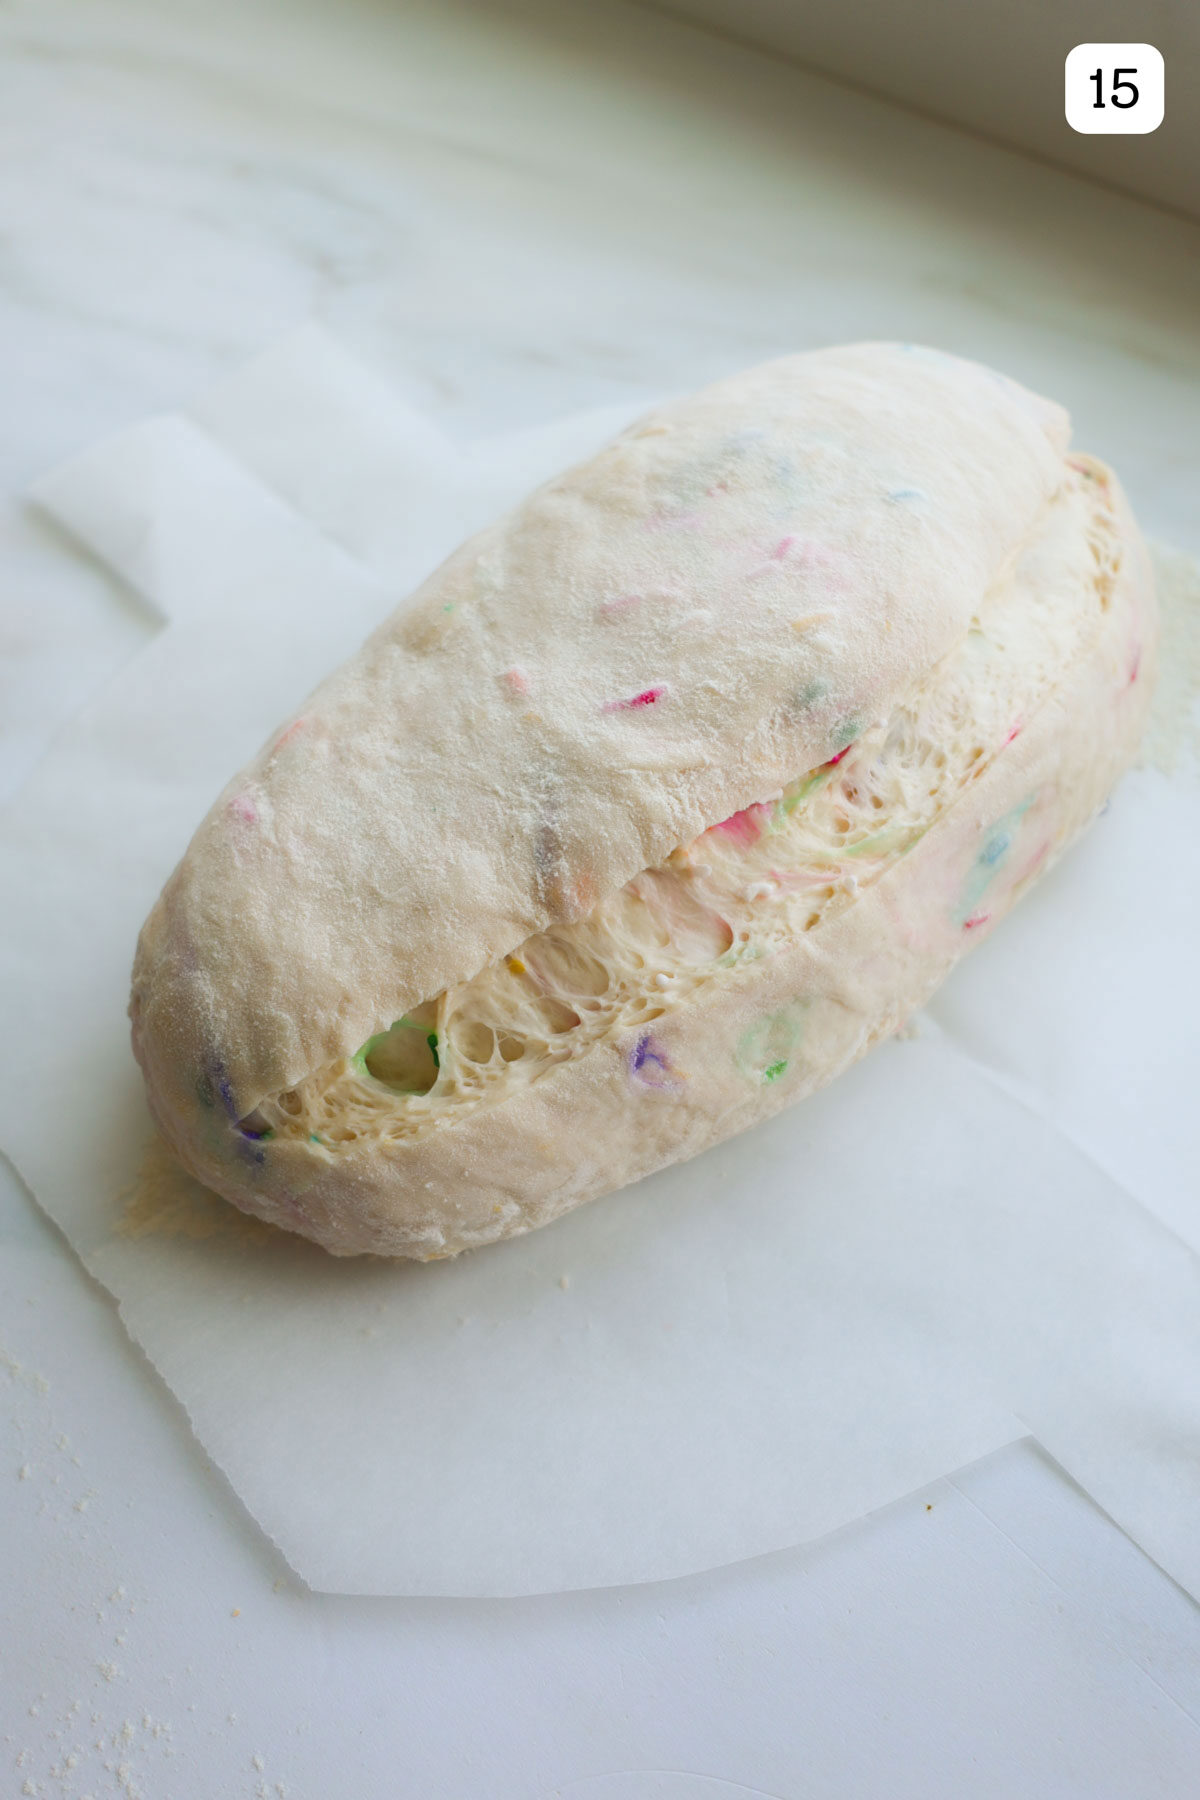
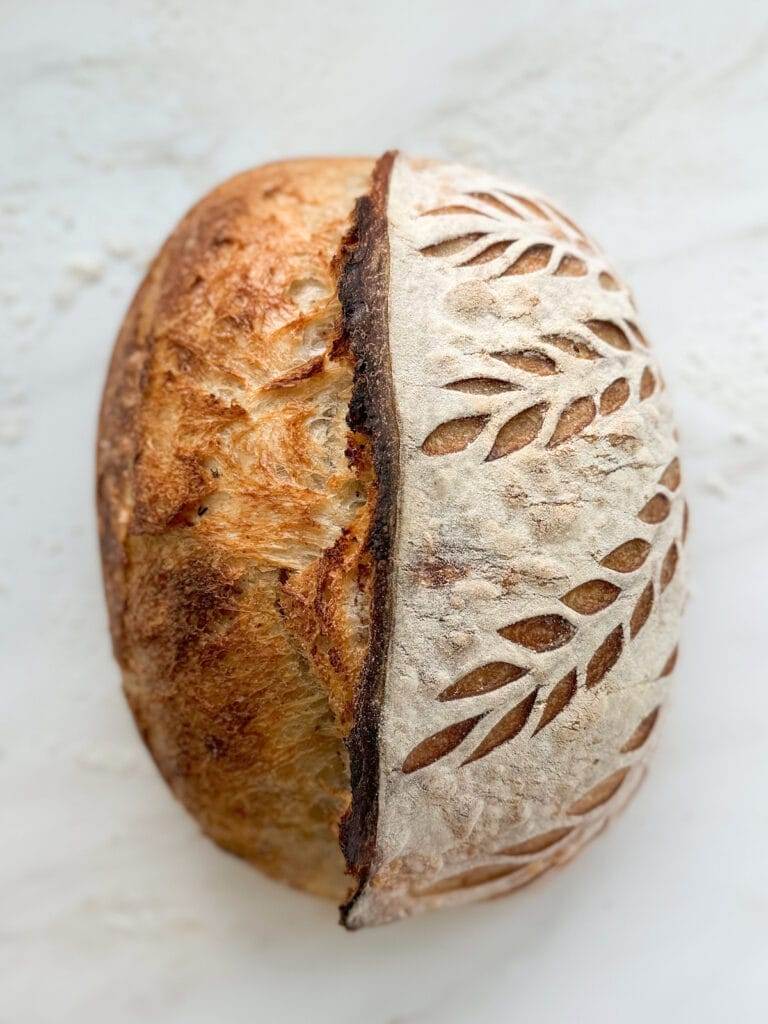
Step 15: After cold proofing, flip the dough over onto a piece of parchment paper. Use a bread lame to score the bread. Now it’s time to bake!

Step 16: Bake in a preheated 450°F oven. Bake in a Dutch oven with the lid on for 30 minutes. Remove the lid and bake an additional 7-10 minutes. The internal temperature of the loaf should be at least 200°F. Transfer the funfetti sourdough loaf to cool on a wire cooling rack for at least two hours before slicing.
Recipe Tips
- Don’t skip rubbing the lemon zest and sugar together with your fingers. It really does bring out the flavor of the lemon.
- Just like in my Easy Sourdough Bread recipe, if you slice the bread before it has completely cooled, it will have a gummy texture. As it’s cooling down, it’s continuing to bake internally. Give it at least two hours to cool.
- To keep the color from the sprinkles from bleeding, add them gently in the last two set of folds – do not add them before that.
Frequently Asked Questions
Place a baking sheet on the oven rack directly below your Dutch oven. This always does the trick! Also, you can place a folded up piece of parchment paper on the bottom of your Dutch oven to put more space between your loaf and the pan.
Do not coat your funfetti sourdough loaf with sprinkles. In theory, it would look really cute. But the sprinkles will melt into a sticky mess in the oven. I learned this the hard way!
When you’re baking with natural yeast, your recipes will take longer to rise than when baking with a commercial, dry yeast. Temperature plays a key role in how quickly or slowly your sourdough rises. The warmer the temperatures, the faster it will ferment. Monitor the temperature of your sourdough. You should aim for a target dough temperature of around 78-80°F. If your dough isn’t rising, try placing it in a warm place in your kitchen. Put it in the oven with the oven light on. The warmth from the light will help warm up your dough.
It’s also important that you use a mature, ripe and healthy sourdough starter. It’s the foundation of every good loaf.
More fun sourdough recipes


Funfetti Sourdough Bread Recipe
Funfetti Sourdough Bread
Ingredients
- 330 g water room temperature, around 76°F
- 100 g ripe sourdough starter
- 50 g granulated sugar
- the zest from 1 lemon
- 550 g high protein bread flour
- 75 g rainbow sprinkles
- 10 g brown rice flour for dusting banneton and loaf
Instructions
Prepare the lemon zest and sugar
- In a small bowl, combine the sugar and lemon zest. Rub the lemon zest and sugar between your fingers to release the flavor from the lemon. Set aside.
Mix the dough
- To a large bowl, add the water and sourdough starter. Mix together with your hands to break up the starter. Add the lemon sugar mixture and flour. Mix with a Danish dough hook or by hand. Make sure no dry bits of flour remain. Cover and let rest 30 minutes.
- Sprinkle the salt and add an additional 20g of water over the dough. Pinch it together with your fingers to fully incorporate. Cover and let rest 30 minutes.
Dough Development
- Over the next 90 minutes, you'll develop the dough through a series of "stretch and fold". This is a gentle kneading process to develop the strength of the dough, which will help it keep its shape as it rises. Stretch & Fold 1: Remove cover from bowl. Wet your fingers with water to prevent the dough from sticking as you handle it. Lift up on the side of the dough furthest away from you, stretch it up and fold it over itself. Rotate the bowl 90 degrees, lift up on dough and fold it over again. Repeat until all four sides of dough have been stretched and folded. Cover dough and let rest 30 minutes. This is your first series of stretch and fold.
- Stretch & Fold 2: After the dough has rested 30 minutes, it will have flattened out. Stretch and fold all four sides of the dough, just as you did in series 1. Cover and let rest 30 minutes. Stretch & Fold 3: After the dough has rested 30 minutes, you're going to start to incorporate the sprinkles into the dough as you stretch and fold for the third time. Pour about 1/4 of the sprinkles over the top of the dough and stretch and fold the top side of the dough over. Add more sprinkles on top, stretch and fold the left side of the dough. Continue to your third series of stretch and fold, incorporating up to half the total sprinkles. The sprinkles should be distributed throughout the dough. Cover and let rest 30 minutes. Stretch & Fold 4: After the dough has rested 30 minutes, continue the fourth series of stretch and folds while also incorporating the remaining half of the sprinkles into the dough. Cover and let rest for the remainder of bulk fermentation.
Bulk Fermentation
- Bulk fermentation is when you allow the dough to rise all together. There's no exact time for this process, but there are some signs to look for. You'll know bulk fermentation is complete when: the dough has risen about 40% in volume, has bubbles throughout with a few on top, pulls away from the sides of the bowl easily, and jiggles when you slide the bowl back and forth. This may take about 3-4 hours with a target dough temperature of 78°F. If your dough or kitchen is colder, this could take longer.
Pre Shape
- Turn the dough out onto a clean work surface. Be careful not to deflate the dough. Wet your fingers with water to keep them from sticking to the dough. You can wet your bench knife with a bit of water too. Slide the edge of the bench knife under the side of the dough and sweep it in a semi-circle motion, while tucking the dough under with your free hand. The goal is to create tension on the outside of the dough, while also shaping it into a ball. Repeat this motion until you have a round ball of dough.
Bench Rest
- Let the dough rest, uncovered for 30 minutes. During this time, the dough may slightly flatten and the gluten will relax.
- Prepare a 9 to 10-inch oblong (batard) proofing basket by dusting with rice flour, or line with a linen towel or hair net (no need to flour the hair net if you are cold proofing). Set aside.
Final Shape
- Flour the top of the dough. Using the bench knife, flip the dough over so that the smooth, floured side is facing down on the counter. Pull the top of the dough (the side furthest away from you) towards the center and slightly press down, securing it in place. Pull the left side of the dough over towards the center, followed by the right side. Press down, securing the dough in place. Roll the bottom of the dough towards the center and away from you. Continue rolling, shaping a loaf. Pull it back towards you a few times, tightening the outside of the loaf. Pinch the ends shut if needed.
- Slide the bench knife under the dough, flip it over and into the prepared proofing basket. Lightly dust the top with rice flour. Cover with a plastic shower cap or a plastic bread bag (something that will keep it from drying out).
Cold Proof
- Place in the refrigerator to cold proof for at least 12 hours or up to 48 hours. Note: At this point, you can also leave it out and let it rise until puffy, another 2-3 hours. Then bake as directed in the recipe.
Preheat oven
- Put a Dutch oven, with the lid, onto the middle rack of the oven. Set oven to preheat to 450°F.
- Once oven has preheated for 30 minutes, remove the loaf from the refrigerator. Remove the cover and place a piece of parchment paper over the top. Flip the banneton over, releasing the loaf. It should now be right side up, resting on the parchment.
Score
- Using a sharp knife, or bread lame, score the loaf on one side, from end to end. Score with the blade at a 45 degree angle, cutting about one-half inch deep.
Bake
- Remove the Dutch oven and take off the lid. Lift the loaf with parchment paper into the Dutch oven. Place the lid on and put into the oven.
- Bake with the lid on for 30 minutes. Remove the lid and continue to bake for 7-10 minutes, until the loaf is lightly golden. If you have a digital food thermometer, take the internal temperature of the dough – it should be at least 200°F.
- Lift the bread out of the Dutch oven with the sides of the parchment paper. Place loaf onto a wire cooling rack and discard the parchment. Allow bread to cool at least 2 hours (preferably 3 hours) before slicing. Enjoy your cute Funfetti bread!
Notes
- Baking without a Dutch oven: You can bake sourdough without a Dutch oven. The main idea is to create steam in your oven to help it rise nice and tall. You can bake it on a baking sheet or preheated baking stone. Place a deep pan on the bottom of your oven and preheat it with your oven. Carefully add boiling water to the hot pan and close oven door. Let the oven steam up for about 5 minutes before baking the loaf. Bake with the steam for all but the last 10 minutes of the bake time. *To be safe, place a towel over the glass oven door while adding and taking out the hot water.
- Stretch and Folds: You can do coil folds instead of stretch and fold – use whichever technique you prefer.
- Ripe Sourdough Starter: Make sure you use your starter when it’s bubbly and active. For me, I use my starter in the morning at feeding time – I add what I need to my recipe, making sure I have enough left over to feed with.
- Temperature: Both dough temperature and climate temperature play a big role in how your dough develops. My kitchen is usually around 76°F. I use room temperature water…so my dough is typically around 76-78°F. My recipe is written taking these factors into account. Warmer temperatures speed up the fermentation process and colder temperatures slow it down. Depending on your kitchen and water temperature, your dough may develop at a different rate than mine. Use your baker’s intuition to look for the signs of the completion of bulk fermentation.
- Sprinkles: Use the tube-shaped sprinkles, called jimmies. Smaller, nonpareils are too little and will melt away in the dough.
Nutrition